Manually Creating a Data Source
If you want to manually create address books to be used by specific devices, then you need to create a new Data Source where you can enter records directly into DMA![]() Device Management and Automation (DMA) is an alternative to TMS
Device Management and Automation (DMA) is an alternative to TMS![]() A Cisco solution to manage and monitor video conferencing equipment. It provides software updates, administration, and meeting booking and reporting.
Entered end-of-life in August 2023.. Deployed ‘on premises’ as part of a Cisco Meeting Server and Cisco videoconferencing devices eco-system.
Complete set of OBTP (One Button To Push), Directory Service, Device Configuration, Device Monitoring. DMA is licensed on a per Video Endpoint device basis..
A Cisco solution to manage and monitor video conferencing equipment. It provides software updates, administration, and meeting booking and reporting.
Entered end-of-life in August 2023.. Deployed ‘on premises’ as part of a Cisco Meeting Server and Cisco videoconferencing devices eco-system.
Complete set of OBTP (One Button To Push), Directory Service, Device Configuration, Device Monitoring. DMA is licensed on a per Video Endpoint device basis..
In the initial releases of DMA there is only one Data Source available: the Internal DMA device database![]() The Call Bridge reads from and writes to the database storing the space information, for example, the members of spaces, and recent activity within a space. In a scalable and resilientscalable and resilient deployment, the database can be detached from the Call Bridge and run as a separate component. It can be on the held on the same server as the Call Bridge or on a different server. Multiple instances of the database can be clustered together to provide resiliency in the deployment..
The Call Bridge reads from and writes to the database storing the space information, for example, the members of spaces, and recent activity within a space. In a scalable and resilientscalable and resilient deployment, the database can be detached from the Call Bridge and run as a separate component. It can be on the held on the same server as the Call Bridge or on a different server. Multiple instances of the database can be clustered together to provide resiliency in the deployment..
Data Sources can be added to DMA by:
importing data from an existing TMS. See Data Sources Overview for more information.
from a subset of the existing DMA database. See Create a sub-set of DMA Data Source for more information.
from an existing LDAP
 The Lightweight Directory Access Protocol (LDAP) is a directory service protocol that runs on a layer above the TCP/IP stack. It provides a mechanism used to connect to, search, and modify Internet directories.
The most common use of LDAP is to provide a central place for authentication where usernames and passwords are stored. Different applications and services then use LDAP to validate users with a plugin.
See also Active Directory (AD) server and configuration. See Create LDAP Data Source for more information.
The Lightweight Directory Access Protocol (LDAP) is a directory service protocol that runs on a layer above the TCP/IP stack. It provides a mechanism used to connect to, search, and modify Internet directories.
The most common use of LDAP is to provide a central place for authentication where usernames and passwords are stored. Different applications and services then use LDAP to validate users with a plugin.
See also Active Directory (AD) server and configuration. See Create LDAP Data Source for more information.from an existing CSV file. See Create Data Source from CSV file for more information.
manual entry. See Create a Data Source Manually for more information.
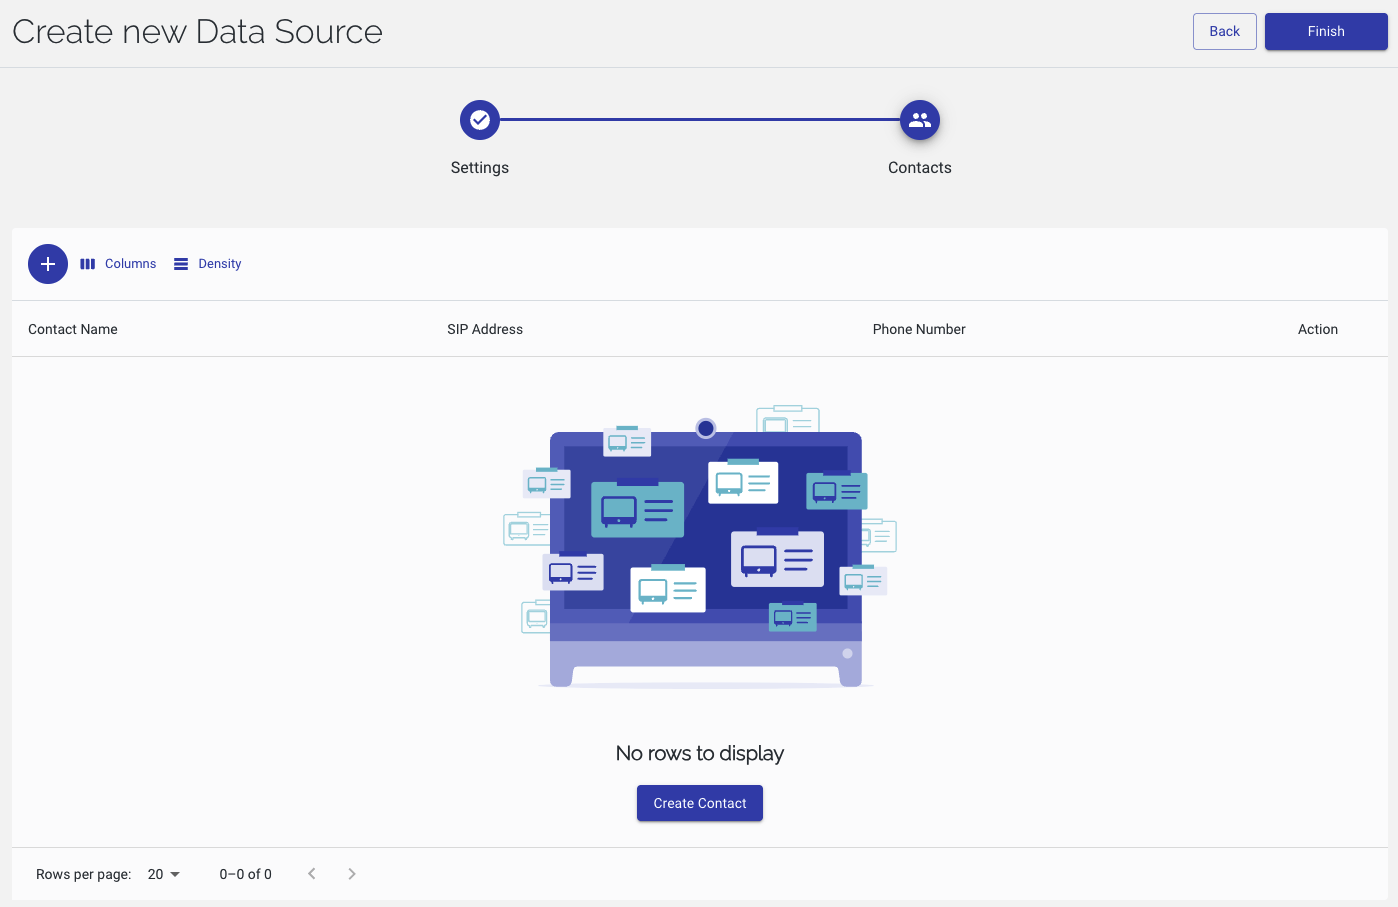
To manually add a record to DMA:
-
Select the Data Sources option on the side menu bar.

-
Click
 .
. -
In the Create new Data Source dialog, in the Settings page, enter a Name, select Manual (Manually create Contacts) as the data source, and optionally add a Description.

-
Click Next: Contacts.
-
In the Contacts page, click
. 
-
In the Create Contact dialog, enter a Display Name and SIP
The Session Initiation Protocol (SIP) is a signaling protocol that enables the Voice Over Internet Protocol (VoIP) by defining the messages sent between Endpoints and managing the actual elements of a Call. address, and optionally a Description and Phone Number, then click Create Contact.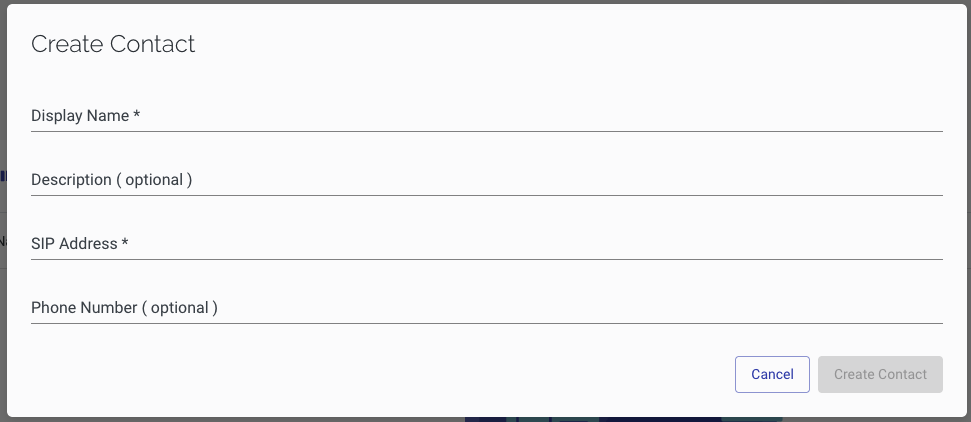
-
Confirm that the new contact you are expecting to see is now present.

-
Repeat Steps 5-7 until you have manually entered all the required contacts, then click Finish.