Setting up a watcher to link to a dashboard in Kibana
Introduction
This chapter describes the steps to follow to detect a condition and then generate a mail/message with links to dashboards. Those can be configured to display different time periods, and in this case it is a 10 minutes window centred on the triggering event. The example contains a single dashboard; it could, however, contain many and each dashboard might contain many visualizations – the key concept that all of the data required to support any analysis of the event trigger is delivered to whoever needs to look at it. For example, rather than an email, it could be pushed to Teams, Slack or Service Now.
Create a dashboard that displays relevant data
Documentation for creating dashboards
First of all, you need to create a Kibana dashboard that will display the information you want to see once the watcher alert is triggered. Then, through the watcher actions, we will adjust the time range to focus on what happened around the moment the error was found.
Once you have created your dashboard and added the components you desire, make sure the time range is on absolute mode. You then need to copy the URL of the dashboard from the address bar in your browser, and save it somewhere. It should contain a part that looks similar to this, and it is what we will modify in the watcher:
…time:(from:'2020-01-29T16:48:54.911Z',mode:absolute,to:'2020-01-29T16:49:54.911Z')…
Transform the watcher previously created
Documentation for payload transforms
In order to replace the timestamps used in the URL by the ones retrieved from the Kibana search, we will need to modify the structure of the watcher to utilize variables. We will transform the payload (result of the watcher searches) to create a new one containing the data we want to use in the Email action:
"transform": {
    "script": {
      "source": "def[] items; def firstSearchHits = ctx.payload.first.hits.total; def secondSearchHits = ctx.payload.second.hits.total; def fromTime = ctx.execution_time.plusSeconds(-300); def toTime = ctx.execution_time.plusSeconds(300); def timeFirstError = ctx.payload.first.hits.hits.0._source.timestamp; items = new def[] {firstSearchHits,secondSearchHits,fromTime,toTime, firstErrorTime}; return items;",
      "lang": "painless"
    }
}
We have now defined a time range that starts 5 minutes before the moment the watch was triggered, and ends 5 minutes after it was triggered.
After this operation, the newly transformed payload contains an array of values (defined in items), and those can be acceded by using:
ctx.payload._value.{index_in_array}.
The transform block is executed after the search (after the first payload is created), but before any other actions. Therefore, we need to update the previous references to the payload in order to use the new ones.
Utilize the new payload data
After the transform, we have an array of data containing:
{firstSearchHits,secondSearchHits,fromTime,toTime,firstErrorTime}
We can now replace the previous references to the payload data. In our case, it concerns the Email Action condition, and the information returned to the user in the email.
Here is the change for the action condition:
"source": "return ctx.payload.first.hits.total > 0 && ctx.payload.first.hits.total < 30 && ctx.payload.second.hits.total != 30",
TO
"source": "return ctx.payload._value[0] > 0 && ctx.payload._value[0] < 30 && ctx.payload._value[1] != 30",
Note: In the painless scripts, you access the values in the array by doing _values[index]. In the rest of the watcher, you have to use _values.index. In both cases, the index starts at 0
In the body of the email, we can now include useful data easier, for example:
"text": "The watcher has detected CDR Connection Failure errors. The first error happened at: {{ctx.payload._value.4}}\nThere are {{ctx.payload._value.0}} hits in the first 30s after {{ctx.payload._value.2}}, and {{ctx.payload._value.1}} hits in the 30s period before the search."
We can also include the previously created dashboard URL, by modifying it with the new values. The change should look like this:
…time:(from:'{{ctx.payload._value.2}}',mode:absolute,to:'{{ctx.payload._value.3}}')…
Note: It is currently impossible to create a shorter version of the link
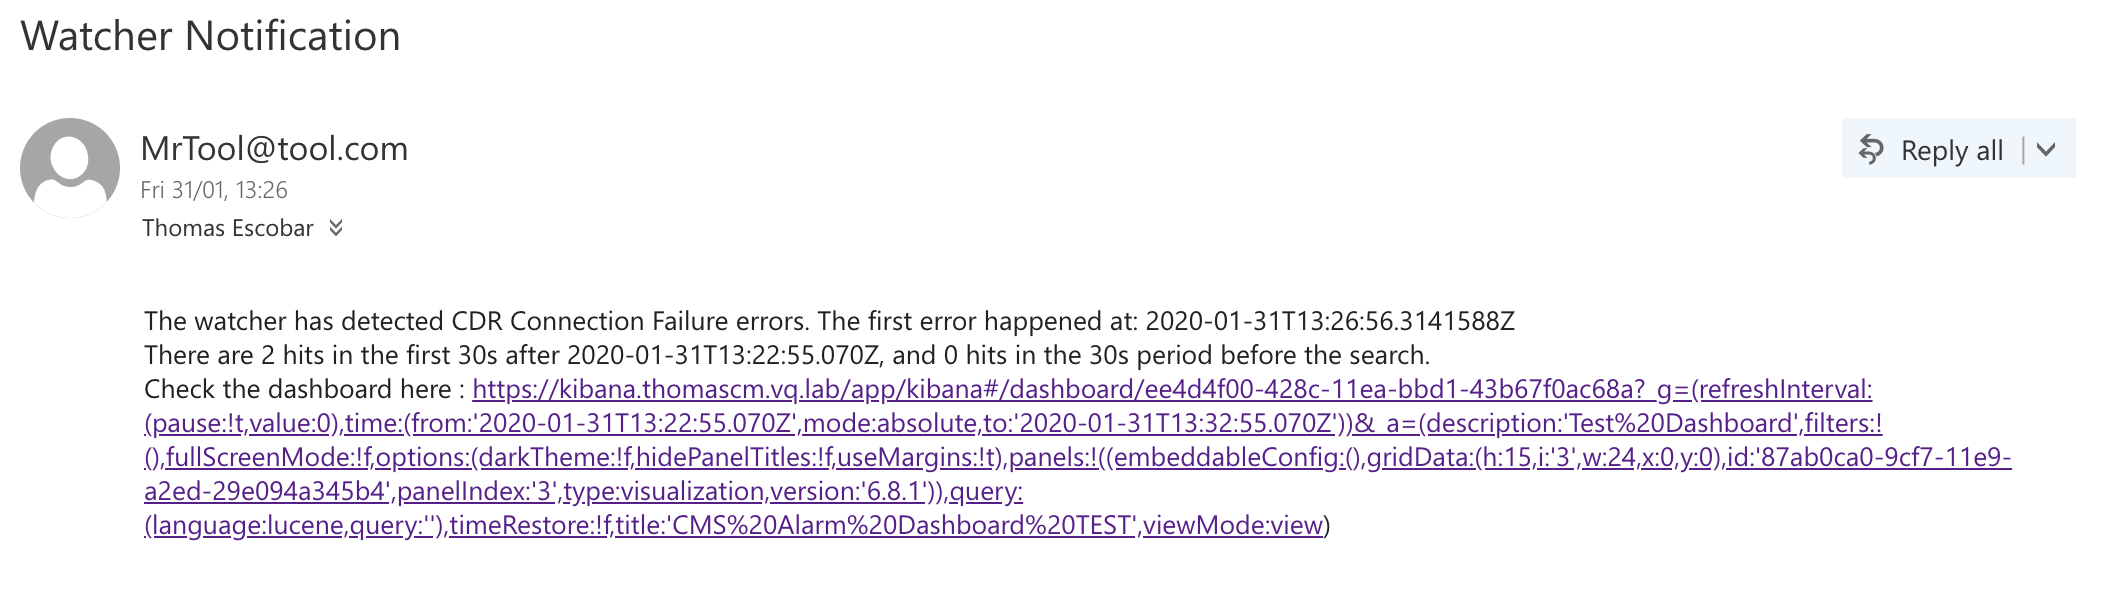
The email received by the user should look like this, and contain a link to the dashboard displaying the correct time range: