Pane Placement
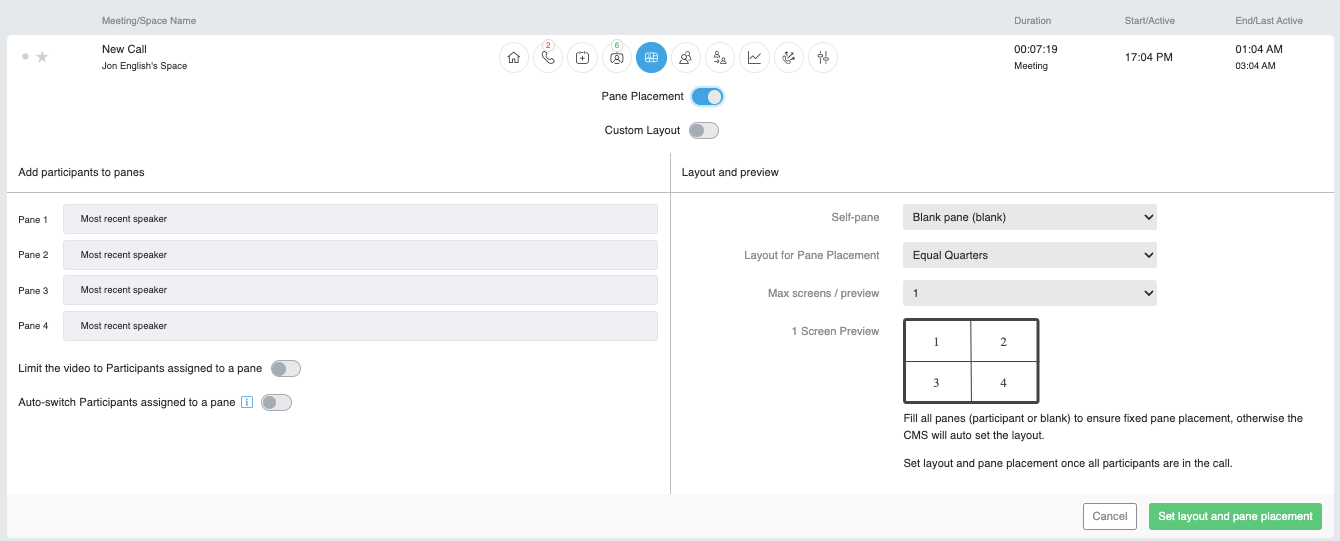
First of all, the term ‘pane placement’ should be viewed as being rather misleading; it suggests that participants can be placed in particular panes. We might change the name “Pane Placement” in a future release.
Whilst participants can be placed in specific panes, there are a whole range of cases that result in results you might not expect.
Read on.
Enabling Pane-Placement
By default, pane-placement is turned off. Enable it at the User Profile (“UX Profile”) level by enabling Pane-Placement within coApps.
In addition, control over which Pane-Placement options are displayed to the user can be configured via the Pane Placement coApp at the UX Profile level.
PanePlacement SelfPane and CustomLayout can be enabled/disabled.
If PanePlacement SelfPane is not enabled, Self-Pane will default to Blank (see below).
CustomLayout should only be enabled if you thoroughly understand Layouts on CMS. For more details see section “Custom Layouts”.
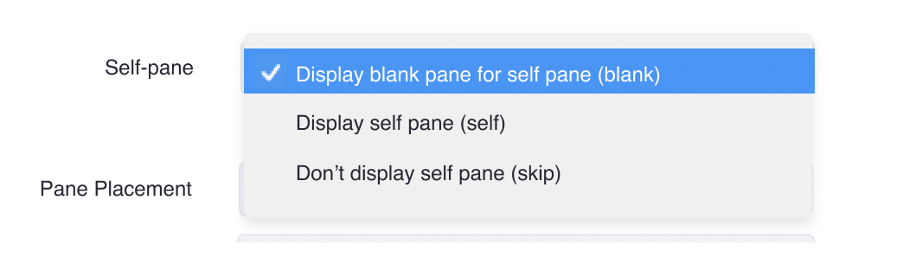
Self-Pane
“Self-Pane” describes the video pane displaying the video received by CMS from a participant. It can also be called “self-view”. Essentially, CMS returns a copy of the video received from a participant’s video system in the video payload that will be displayed.
It can be useful in that it allows the participant to see their video as seen by everyone else in the call. It does, however, suffer from the fact that there is a small latency between video capture and display due to the round-trip time taken to transmit the video, process in CMS and then return it back to the device. If the participant has local self-view enabled (the real-time view of the video being captured), this latency/delay can be distracting.
Self-Pane can be one of three values:
-
Blank
-
Self
-
Skip
Self
When set Self, the video received from each video system is returned to the device as part of the video payload generated by CMS. So, for example, if the video layout for the call is a 4-way quad split and the device has been selected to appear top-right, the video received from the device will be sent back to the device as part of the video payload and will appear top-right.
All participants in the call will receive the same video stream. Continuing with the same example, all will see video from this particular device top-right in a 4-way quad split.
Blank
When set Blank, the video received from each device is NOT returned to the device as part of the video payload generated by CMS. Instead, a blank video pane is returned.
All participants in the call will receive the same video stream. Continuing with the same example, all will see a blank pane top-right in a 4-way quad split.
Skip
With “Self-Pane” set to Skip, the video received from each video system is NOT returned in the video payload generated by CMS. In our example of a 4-way quad split video layout, the device would receive a video stream containing the video from 4 other devices in the call.
Each video system receives a unique video stream generated by CMS. Each system will receive a video stream containing the video from the 4 other devices in the call (so, essentially, it would be a 5-way call).
Important concept
If you need each participant in the call to see the same video and have the same person (using our example) top right in a 4-way quad split layout, you need to use either “Self-Pane = Self” or “Self-Pane = Blank”.
Setting “Self-Pane = Skip” will result in each participant in the call seeing the video from the other participants in the call. Using our example of a 4-way, quad split layout, each participant will receive a 4-way quad-view but the contents of each of the 4 panes will be different on each device (because the self-view video from each device is not being returned to the sending device).
CMS Automatic Layout override
If the number of participants is less than the available video panes in the selected layout, CMS will ignore the selected video layout and automatically select a “more appropriate” layout.
When determining the number of participants, CMS uses the number of video streams. Participants with Self-Pane = Skip don’t get counted and so will result in an auto-layout being selected if the number of video streams is not sufficient to fill the selected layout.
Using the 4-way, quad split example: If two people are in the call, CMS will override the layout to become single pane (Self-Pane = Skip). If a third participant was then added to the call, the layout received will change to side-by-side.
This feature can be quite surprising the first time you experience it.
To force CMS to maintain the required (in our example, 4-way, quad split) layout, select “Reserved/Blank” as ‘filler’ participants.
Reserved/Blank
“Reserved/Blank” can be specified as a participant selector. As the name suggests, rather than defining a specific participant, a blank pane is displayed and can be used as a filler.
Most Recent Speaker
“Most Recent Speaker” (aka Active Speaker) can be specified as a participant selector. As the name suggests, rather than specifying a specific participant, the currently active speaker is displayed. If more than one “Most Recent Speaker” is selected, CMS displays the video from the next most Active Speaker and the process repeats with each “Most Recent Speaker” added. The only limit to the number of “Most Recent Speaker” is the number of slots in the layout.
“Most Recent Speaker” can only be selected after named or “blank” slots. It is not possible to have Active Speaker slots between named participants and blank slots. Most Recent Speaker slots will always be the last slots in the list.
Operational Guidance
Please get all participants into the call/meeting before using Pane Placement.
Participants joining (or re-joining) the call after Pane Placement has been configured will not automatically receive pane placement commands. This is planned for a future release.
Extending the 4-way split example
If we take the example a bit further, we get a better idea of how the various features can be used in a larger call.
-
3 participants assigned to panes (panes 1..3)
-
1 ‘most recent speaker’ pane (pane 4; bottom right)
-
10 non assigned participants
With Self-Pane = Blank
13 participants join the call (the 3 assigned to each of the panes plus an additional 10)
The 3 participants assigned a pane (1..3) will each see a blank pane; this is their self-view blank filler. Two of the other panes will be the other two assigned participants. Pane 4 (bottom right) will cycle between the last speaker from the set of 10 non-assigned participants.
The 10 non-assigned participants will see panes 1..3 populated by the 3 assigned participants with pane 4 cycling between the last speaker from the set of 10 non-assigned participants.
With Self-Pane = Self
13 participants join the call (the 3 assigned to each of the panes plus an additional 10)
The 3 participants assigned a pane (1..3) will each see a pane containing their self-view and 2 panes for the other 2 named participants. Pane 4 (bottom right) will cycle between the last speaker from the set of 10 non-assigned participants.
The 10 non-assigned participants will see panes 1..3 populated by the 3 assigned participants with pane 4 cycling between the last speaker from the set of 10 non-assigned participants.
With Self-Pane = Skip
13 participants join the call (the 3 assigned to each of the panes plus an additional 10)
The 3 participants assigned a pane (1..3) will each the other 2 named participants in Pane 1 and 2 as the Participants 1 and 2 “shunt up” and take the slot now free because there is no self-view pane. This will happen for each of the participants assigned a slot; none will receive a self-view and so panes 1 and 2 will be from the other two named participants. Each of the 3 will therefore see a different view of the other 2 named participants.
Pane 3 and 4 will cycle between the last speaker from the set of 10 non-assigned participants.
The 10 non-assigned participants will see panes 1..3 populated by the 3 assigned participants with pane 4 cycling between the last speaker from the set of 10 non-assigned participants.
Key points
-
This means for the 3 participants assigned a pane the position of participants will be different to the way it’s be set up in the Pane Placement coApp and how the PP coApp suggests the call will look
-
The 10 non-assigned participants will see what the PP coApp UI indicates.
Assigned Panes
The Assigned Panes features have been created to enable a conference operator to assign specific panes in a meeting to participants and ‘lock’ them in place. This ensures that no matter who is speaking, the participants in view remain the same and if required, stay in their assigned position.
To set up an assigned panes layout, first select an appropriate layout. In this example we will be using a One Plus Five arrangement.
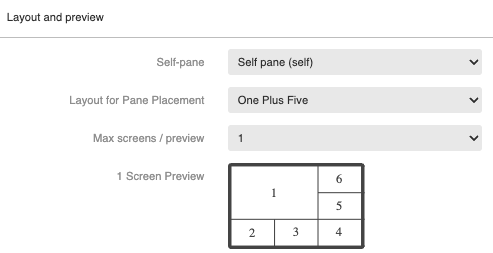
Once the call is running you can then select the participants that will occupy each of the six panes in the layout.
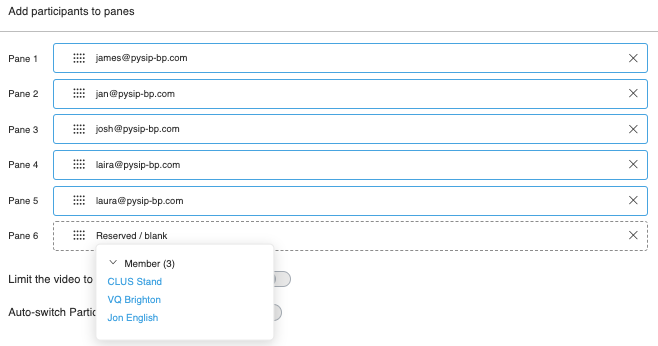
Once the participants have been selected you can use the Limit the video to Participants assigned to a pane switch to lock the view to only display the selected participants no matter who the speaker might be. Anyone not set in the panes will be heard as an audio only participant and not seen.
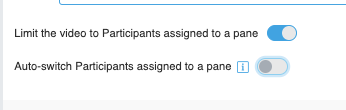
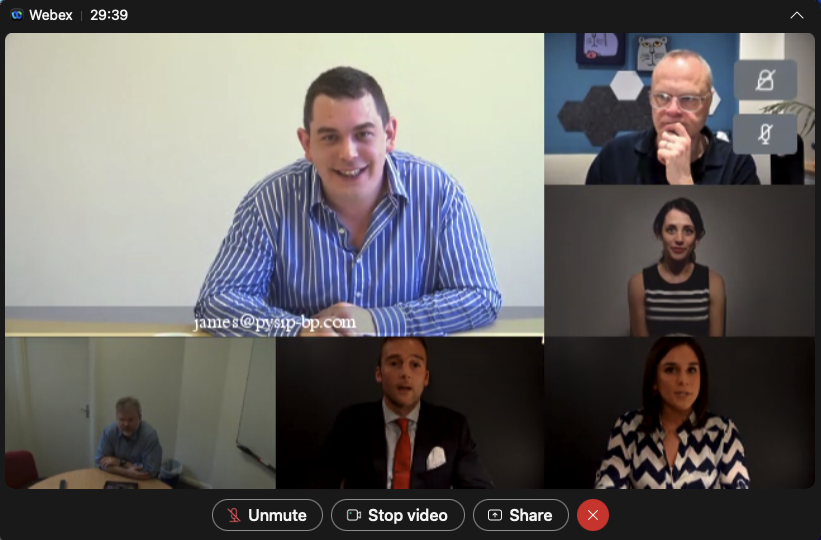
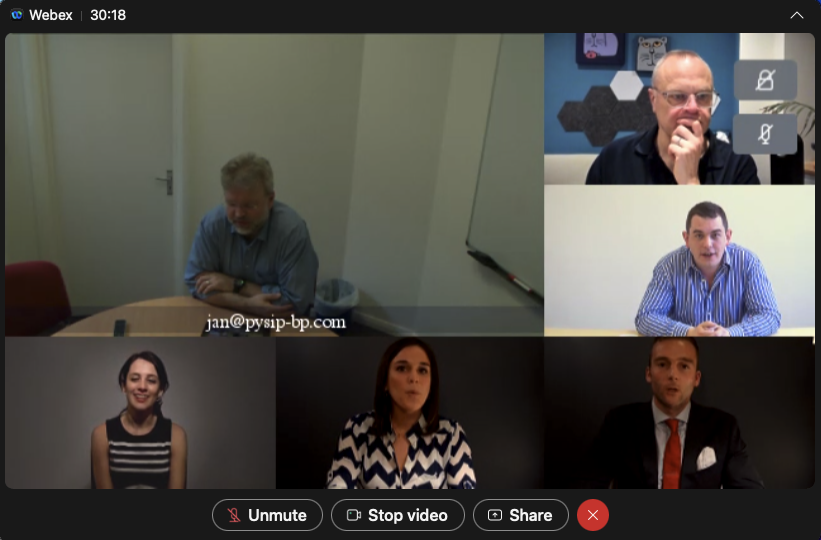
If the Auto-switch Participants assigned to a pane is also set, then the listed participants will switch places in the view based on the current and last speaker. For example: if Jan speaks, they will be placed into Pane 1 and James moves to Pane 5.

Note: When setting or change these layout options don’t forget to click the Set Layout and pane placement  button at the bottom of the page.
Custom Layout
Custom Layout should only be used by users with advanced knowledge of CMS Layouts. Layouts are complex.
With CustomLayout set, VQCM removes all validation and assumes the user knows what they are doing. The results might be unpredictable and we offer no additional guidance other than “read the CMS documentation”. It is quite possible error messages will be displayed and given the wide range of possible scenarios, we are unable to provide any further guidance.
With Custom Layout selected, you are off-piste. Beware, there be dragons.
Custom Layouts allow the following:
-
Once Custom Layouts have been created and configured, Custom Layouts can be selected for VQCM created Spaces. See “Setting up Custom Layouts”
-
Selecting “Automatic Layout” in the Pane Placement Layout selector picks up the Custom Layout (NOTE: no graphical representation of the Custom Layout is generated by VQCM)
-
Selecting “Automatic Layout” in the Activity Layout Selector picks up the Custom Layout
-
Selecting “Automatic Layout” on Space Settings picks up the Custom Layout
-
From Pane Placement, gives the user free (no validation) control over the number of panes and allows them to do as they need
-
Intended for Admins/Operators who fully understand Layouts on CMS.
-
Only use in production environments once you have thoroughly tested your use case scenarios
-
Please read our disclaimers on Custom Layouts being an “off-piste” activity
-
Custom Layouts are provided as a tool for advanced users but are unsupported
-
Enabled by the Pane-Placement controls in the UX Profile
-
On setting pane placement in ‘Custom Layout’ mode the layout is set to Custom Layout and cannot be changed
Setting up Custom Layouts
-
Create a Call Leg Profile containing the GUID of the Custom Layout. Only set the Custom Layout value.
-
Associate the Call Leg Profile with either the Global or Tenant Profile.
-
Because of the “inheritance” model of Call Leg Profile properties, the Custom Layout value will “flow-down” to all Call Legs below it (system wide from the Global Profile and Tenant wide from the Tenant level).
-
Spaces created by VQCM will inherit the Custom Layout setting; all the other values defined by the VQCM Space Template Roles will be assigned to Call Leg Profile created for the Space.
This approach is the easiest to implement. It does mean, however, that all Spaces within the System or a specific Tenant will see the Custom Layout if the “Automatic” layout is selected.
It is possible to configure Space specific Custom Layouts although it is more complicated and should only be done under guidance from a VQ support engineer. Please contact support@vqcomms.com.