LDAP/Active Directory
Overview
LDAP/Active Directory servers are repositories for information regarding users and password management/authentification. Both VQ Conference Manager and a Call Bridge are able to request and retrieve this user data from the LDAP/Active Directory server to do the following:
- Import large numbers of users quickly:
- Create users, Space and endpoints
- Set properties such as name and email automatically
- Users can be imported per Tenant or system wide
- Users can be imported from multiple LDAP/AD servers or from different locations on the same LDAP/AD server
- Delete large numbers of users quickly:
- By setting a filter that results in the LDAP/AD server finding no matches, VQ Conference Manager will delete all users within VQ Conference Manager that do not meet the match criteria. By setting the filter back to a value that results in LDAP/AD finding matches and re-running the Importer will result in these users being re-imported
- Call Bridge and VQ Conference Manager both use the same data
- Perform authentication – the authentication of LDAP users is performed by the LDAP server. VQ Conference Manager and the Call Bridge keep no password details
- Control whether an endpoint is automatically created per user, along with the ability to create endpoint URI's for, e.g. Skype for Business clients
Note: LDAP (X.500) – Lightweight Directory Access Protocol. Microsoft AD is a variant of LDAP (X 500). VQ Conference Manager supports Microsoft Active Directory (AD) and OpenLDAP.
The following diagram illustrates how the request and retrieval of the data is initiated from VQ Conference Manager and how VQ Conference Manager then instructs the Call Bridge to do likewise. All users on the Call Bridge are created from LDAP. VQ Conference Manager can be configured to define LDAP settings, after which VQ Conference Manager can then import users from LDAP and optionally create Space. VQ Conference Manager passes LDAP configuration to the Call Bridge. The Call Bridge then imports users from LDAP and optionally creates Spaces.
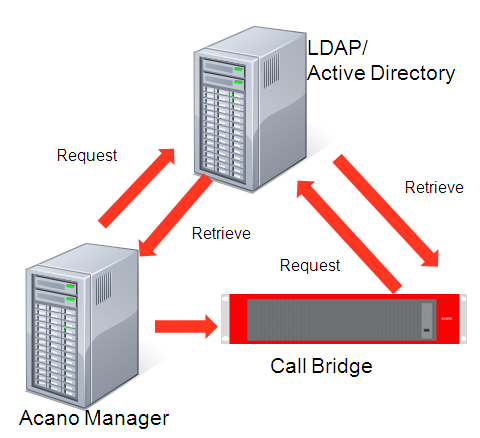
Figure 1: LDAP overview
VQ Conference Manager LDAP Configuration Settings
VQ Conference Manager is able to read LDAP Configuration Settings from the Call Bridge. This process is called "LDAP Discovery" and takes place the first time a Call Bridge is brought online.
There are therefore, two ways LDAP Configuration Settings can be defined:
- Manually, via VQ Conference Manager. VQ Conference Manager writes these to the Call Bridge
- If a Call Bridge already has LDAP Configuration Settings defined, VQ Conference Manager reads the LDAP settings from the Call Bridge and creates them within VQ Conference Manager
Once the LDAP Configuration Settings have been defined (via either route), the VQ Conference Manager LDAP Importer must be run to read the provisioning data from LDAP and create users (the actual type of user is defined by the UX Profile, defined on the LDAP Configuration Settings) and Spaces within VQ Conference Manager and on the Call Bridge.
LDAP Configuration Settings provide the details of where to find the LDAP Server, where on the LDAP Server the data is located, the filters that select the data to be returned and the names of the attributes to be returned.
Attribute Transforms allows values obtained from LDAP to be processed, resulting in different values being saved in VQ Conference Manager. This is useful when the values you have available in LDAP do not quite match the names and values used on the Call Bridge. You can, therefore, process and change the values.
For example:
$email|'/@.*/@mydomain/'$
This transform takes the value of the email attribute returned from LDAP and replaces everything after the @ with the text @mydomain.
$email|'/@.*//$
This transform replaces everything after the @ with an empty string. In this example, the domain component of the email address is removed.
The LDAP Configuration Settings also define which profiles and templates are to be used by VQ Conference Manager for each user.
Multiple LDAP Configuration Settings per Tenant can be defined. This allows different groups of users to be imported from LDAP with different profile types. A simple example would be importing one group of users as user type "User" and another group as user type "Operator".
The LDAP Configuration Settings page allows you to:-
- Bind the settings to a Tenant
- Specify a LDAP server
- Define Multiple Directory Configurations on the same LDAP server
- Use different Operational Units (OU), base or filters to differentiate the data to select
- Specify how Attributes map onto VQ Conference Manager fields
- E.g. User LDAP attribute “$ipPhone$” as the value for coSpacesecondaryURI
- $$ indicates “substitute value”
- ipPhone is an Attribute within LDAP
- Use transforms (via regular expressions)
- Define multiple LDAP Configuration Settings and imports per Tenant; different groups of users can be imported from LDAP with each having different Access Control Settings and UX Profiles. This means multiple groups of users can be imported into Tenants with each group having different properties (UX Profiles – Users, Operators) and Access Controls
- Control whether an endpoint is automatically created per user, along with the ability to create endpoint URI's for, e.g. Skype for Business clients
VQ Conference Manager uses the LDAP Settings data to configure the Call Bridge:
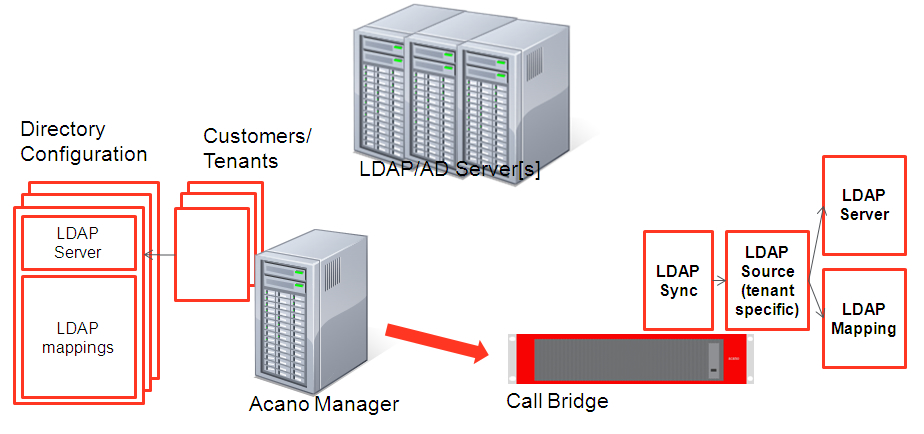
Figure 2: VQ Conference Manager and Call Bridge LDAP settings
VQ Conference Manager sends a command to the Call Bridge to configure LDAP Settings when the user clicks Done on the LDAP details page.
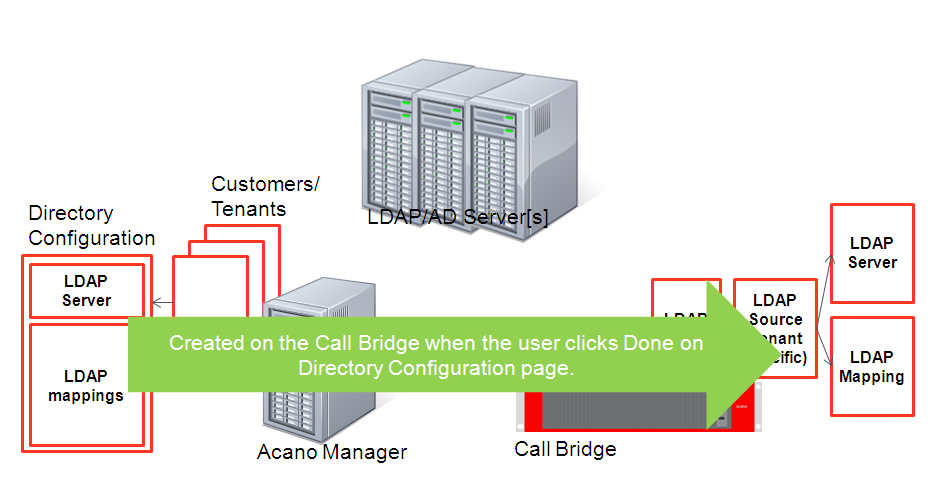
Figure 3: VQ Conference Manager configuring the Call Bridge LDAP Settings
LDAP import sequence diagram
The following diagram defines the sequence of events performed during an LDAP import. The sequence of events id displayed as numbered steps within the diagram.
Vertically, the diagram shows what happens on each server;
- VQ Conference Manager
- LDAP
-
Call Bridge
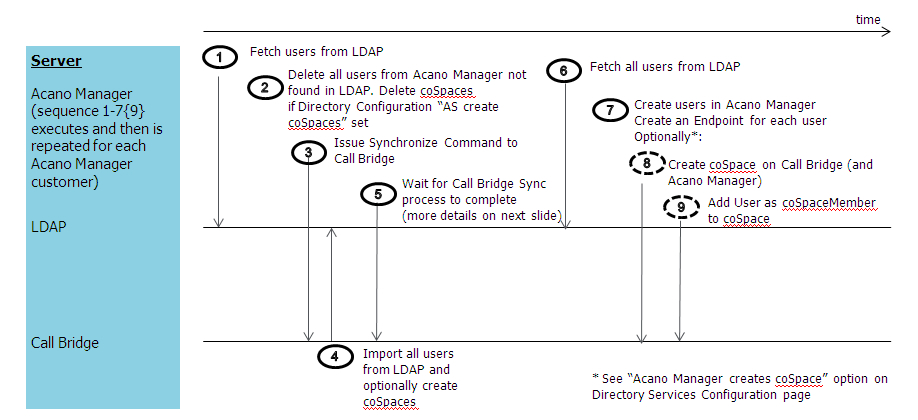
LDAP import sequence of events
Call Bridge synchronization
Step 3 on the following diagram provides more details of the Create Sync command on the Call Bridge.
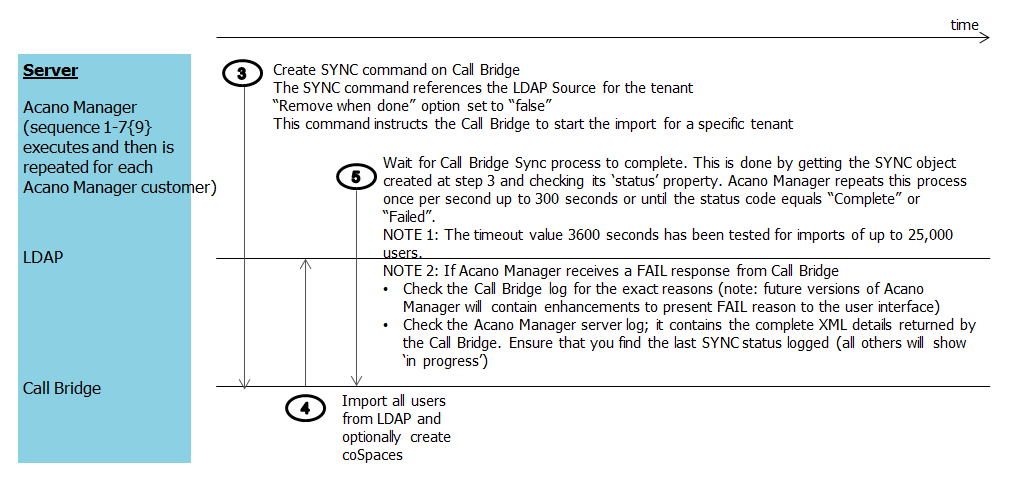
Figure 4: Step 3: Call Bridge synchronization
LDAP Importer logging
You can check that the import process has completed successfully from the LDAP Importer coApp. This is the detailed log file of the import process and contains the logging events and any errors which are experienced during the import process.
The VQ Conference Manager LDAP Importer emails the Importer error and log files to the Administrator email address.
Call Bridge Sync status
The VQ Conference Manager LDAP Import process automatically checks this status and includes it in the results displayed into the LDAP Import results page. However, sometimes it is useful to know where to find it on the Call Bridge. To find this information on the Call Bridge, log into your Call Bridge and navigate to Logs>Event Logs.

Creating new LDAP Configurations and examples of LDAP imports
Importing users for a Tenant
Each user imported from an LDAP server is bound to a LDAP Settings definition which in turn is bound to a Tenant in VQ Conference Manager.
The Tenant defines default UX Profiles and Access Control Settings which are used when a new LDAP Setting is defined for the Tenant; the LDAP Settings page allows these defaults to be overridden allowing multiple user types to be imported onto a single Tenant from multiple LDAP sources.
The VQ "Default Tenant" is a special case Tenant and is used when Tenanting on the CMS cluster is not being used. Think of it being the "no Tenant" case (please see section Tenanting in the chapter of the User Guide).
When setting up an LDAP Import, you therefore either need to have a Tenant (which will need creating - see Creating a Tenant in the chapter) or you can use the "Default Tenant".
Set up the appropriate Tenant’s LDAP Configuration Settings via the LDAP Configuration coApp. Navigation to this is from Tenants>Select the Tenant you require>LDAP Configuration or from System>Default Tenant.
- Select New LDAP Configuration
-
Create the new LDAP settings by completing the LDAP Configuration pages:
- General
- LDAP
- User
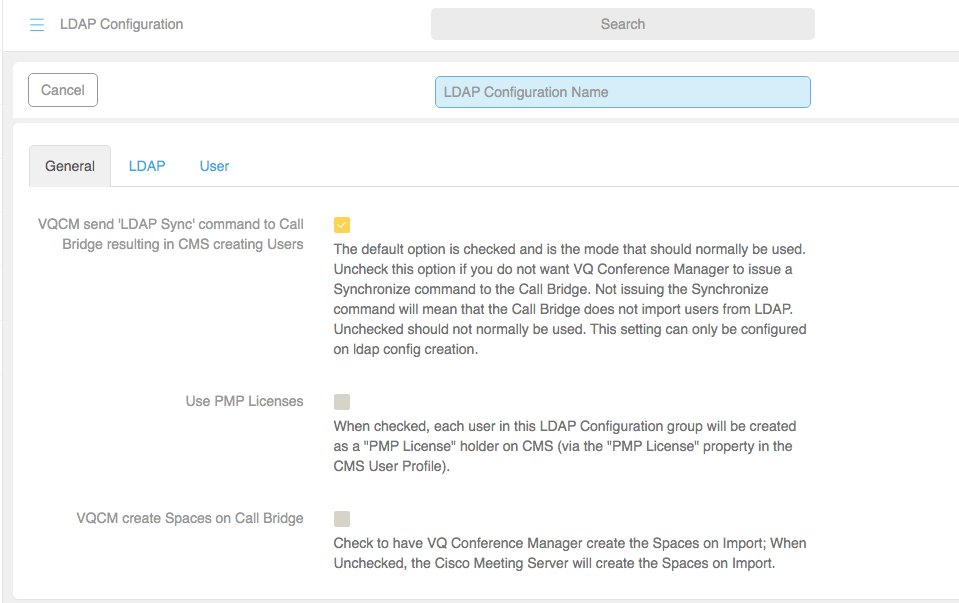
General
Field
Description
VQCM send LDAP Sync command to Call Bridge resulting in CMS creating users The default option is checked and is the mode that should normally be used. Uncheck this option if you do not want VQ Conference Manager to issue a Synchronize command to the Call Bridge. Not issuing the Synchronize command will mean that the Call Bridge does not import users from LDAP. Unchecked should not normally be used. This setting can only be configured on LDAP config creation.
For more information, please refer to LDAP/Active Directory
Use PMP Licences Check box (Yes/No).
When checked, each user in this LDAP Configuration group will be created as a "PMP License" holder on CMS (via the "PMP License" property in the CMS User Profile).
For more information refer to .
VQCM create Spaces on Call Bridge
Check the Spaces on LDAP Import box and VQ Conference Manager will create the Spaces on Import. If left unchecked, the Call Bridge will create the Spaces on import. These Spaces will only appear in VQ Conference Manager once they have been dialed into or if you search for them.
LDAP
Field
Description
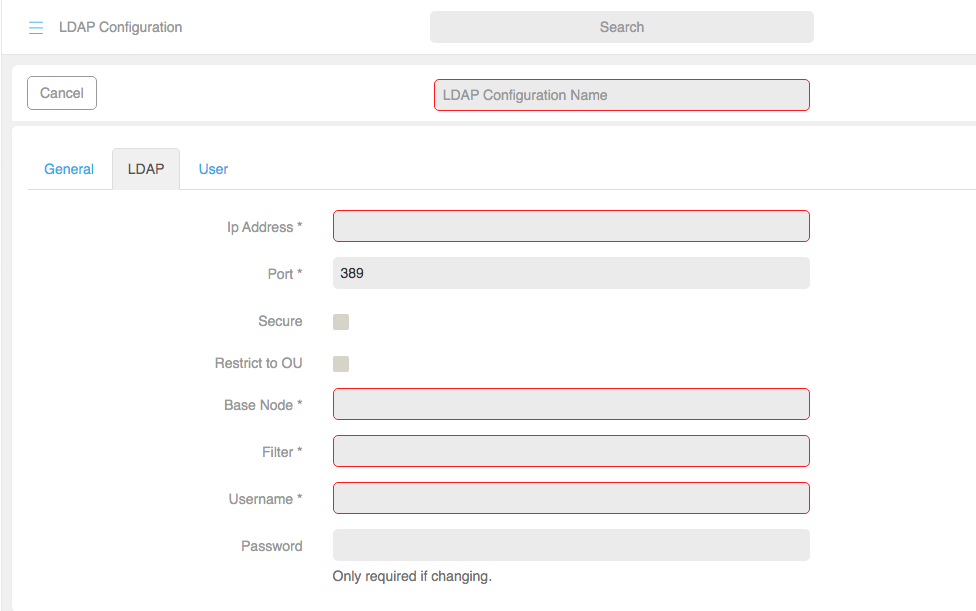
IP address*
In this example the IP address for the LDAP server is 198.168.1.6.
Port*
389 – default, 686 – secure port, 3268 – Global Catalog (used in clustered Active Directory environments), 3269 is the HTTPS equivalent for Global Catalog.
Secure Is it encrypted?. Restrict to OU Base Node* cn=Users,dc=stress,dc=acano,dc=com Filter *
e.g.(&(user=fred))
Username * $sAMAccountName$@domain.com Password User
Field
Description
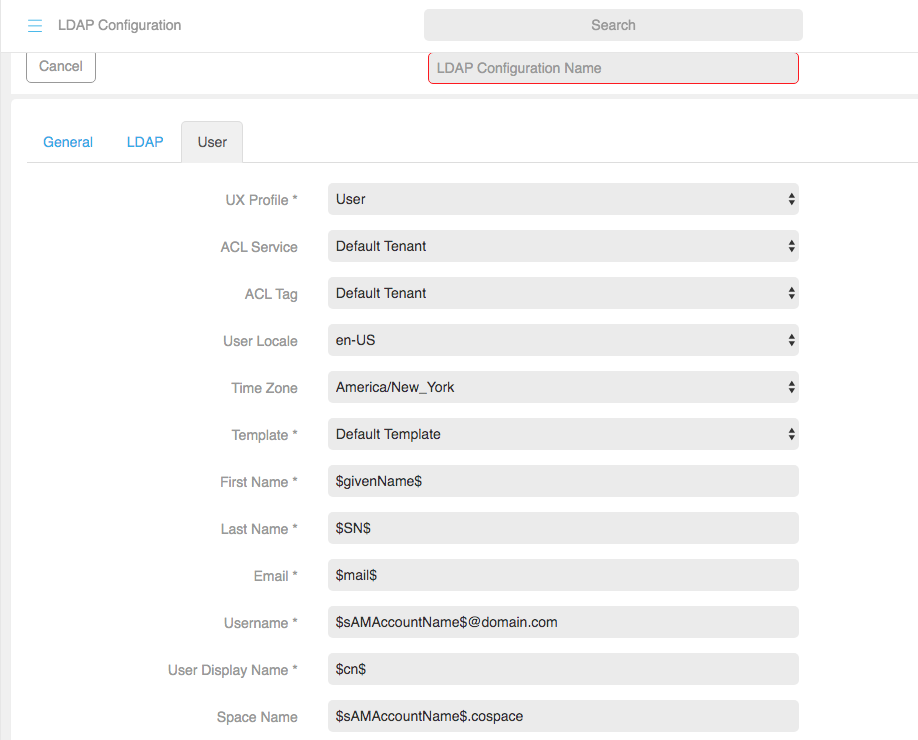
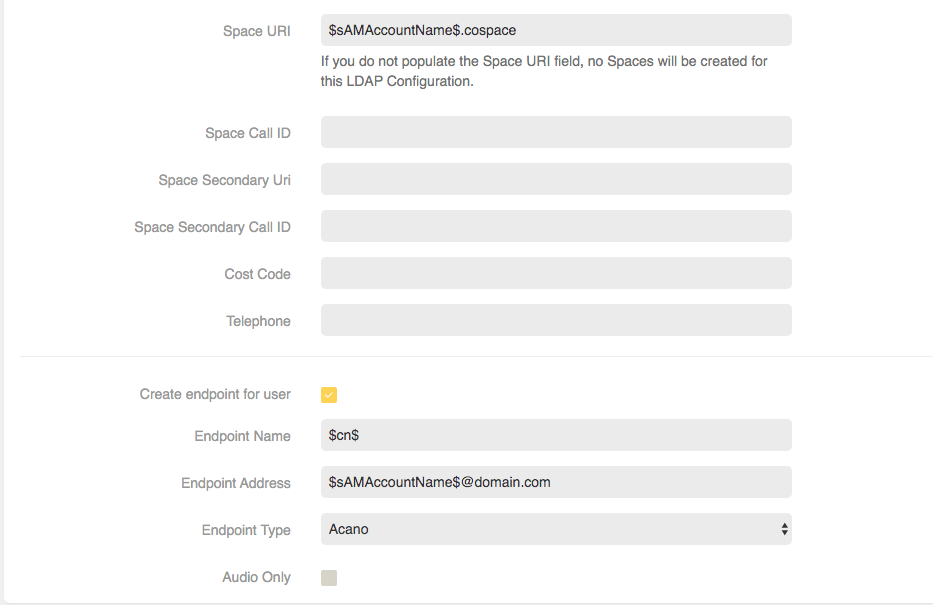
UX Profile* Controls the type of user which will be created, for example, User, Operator, Administrator. ACL Service The Access Control Service for each user. ACL Tag The Access Control tag for each user. User Locale e.g. en-GB (DD/MM/YYYY) date and 24 hour times or en-US (MM/DD/YYYY) adn AM/PM time. Timezone* e.g. Europe/London. Template* e.g. Huddle Room. First Name* $givenName$ Last Name* $SN$ Email* $mail$ Username * $sAMAccountName$@domain.com User Display Name* The values $$ used in these fields are the attribute names to extract from LDAP. Think of them as columns in a database.
If required, transforms can be applied to the values returned by using “pipe commands”
e.g. “$mail|'/@.*//'$@mydomain.com” means import column mail and then apply a regex transform command to it; replace the ‘@’ and any subsequent characters with an empty string (“//” – in other words, remove the domain component) and append the required new domain “@mydomain.com”.
In addition to $$ keyword, from AM 2.3 MR2 we added %%. This allows the Call Id to be shared across multiple files (specifically primary URI, secondary URI and Call ID. It will work with the multi-role URI/Call Id fields as well. For more information please refer to LDAP/Active Directory .
$cn$
Space Name $sAMAccountName$.space Space URI $sAMAccountName$.space Space Call ID Space Secondary URI Space Secondary Call ID Cost Code Telephone Create endpoint for user Check box (Yes/No) Endpoint Name $cn$ Endpoint Address $sAMAccountName$@domain.com
Endpoint Type Select from the drop down. e.g. Acano (CMA), S4B, SIP Audio Only
Table 1: LDAP Configuration Settings
The following step is not required to perform the LDAP import process but has been added so you can check, what you started with and what you get after the import, should you wish to double check.
Confirming that you don’t have users or endpoints using “Users” or “Tenants” on BigCo before you perform the LDAP import:
- Search on “BigCo” from the search bar
- The page displays a single user only, who is not associated with “BigCo” and no endpoints for “BigCo” as expected

To perform the import:
-
From BigCo>LDAP Importer coApp, select BigCo LDAP and click on Next. Then click on Import for the LDAP configuration you want to import
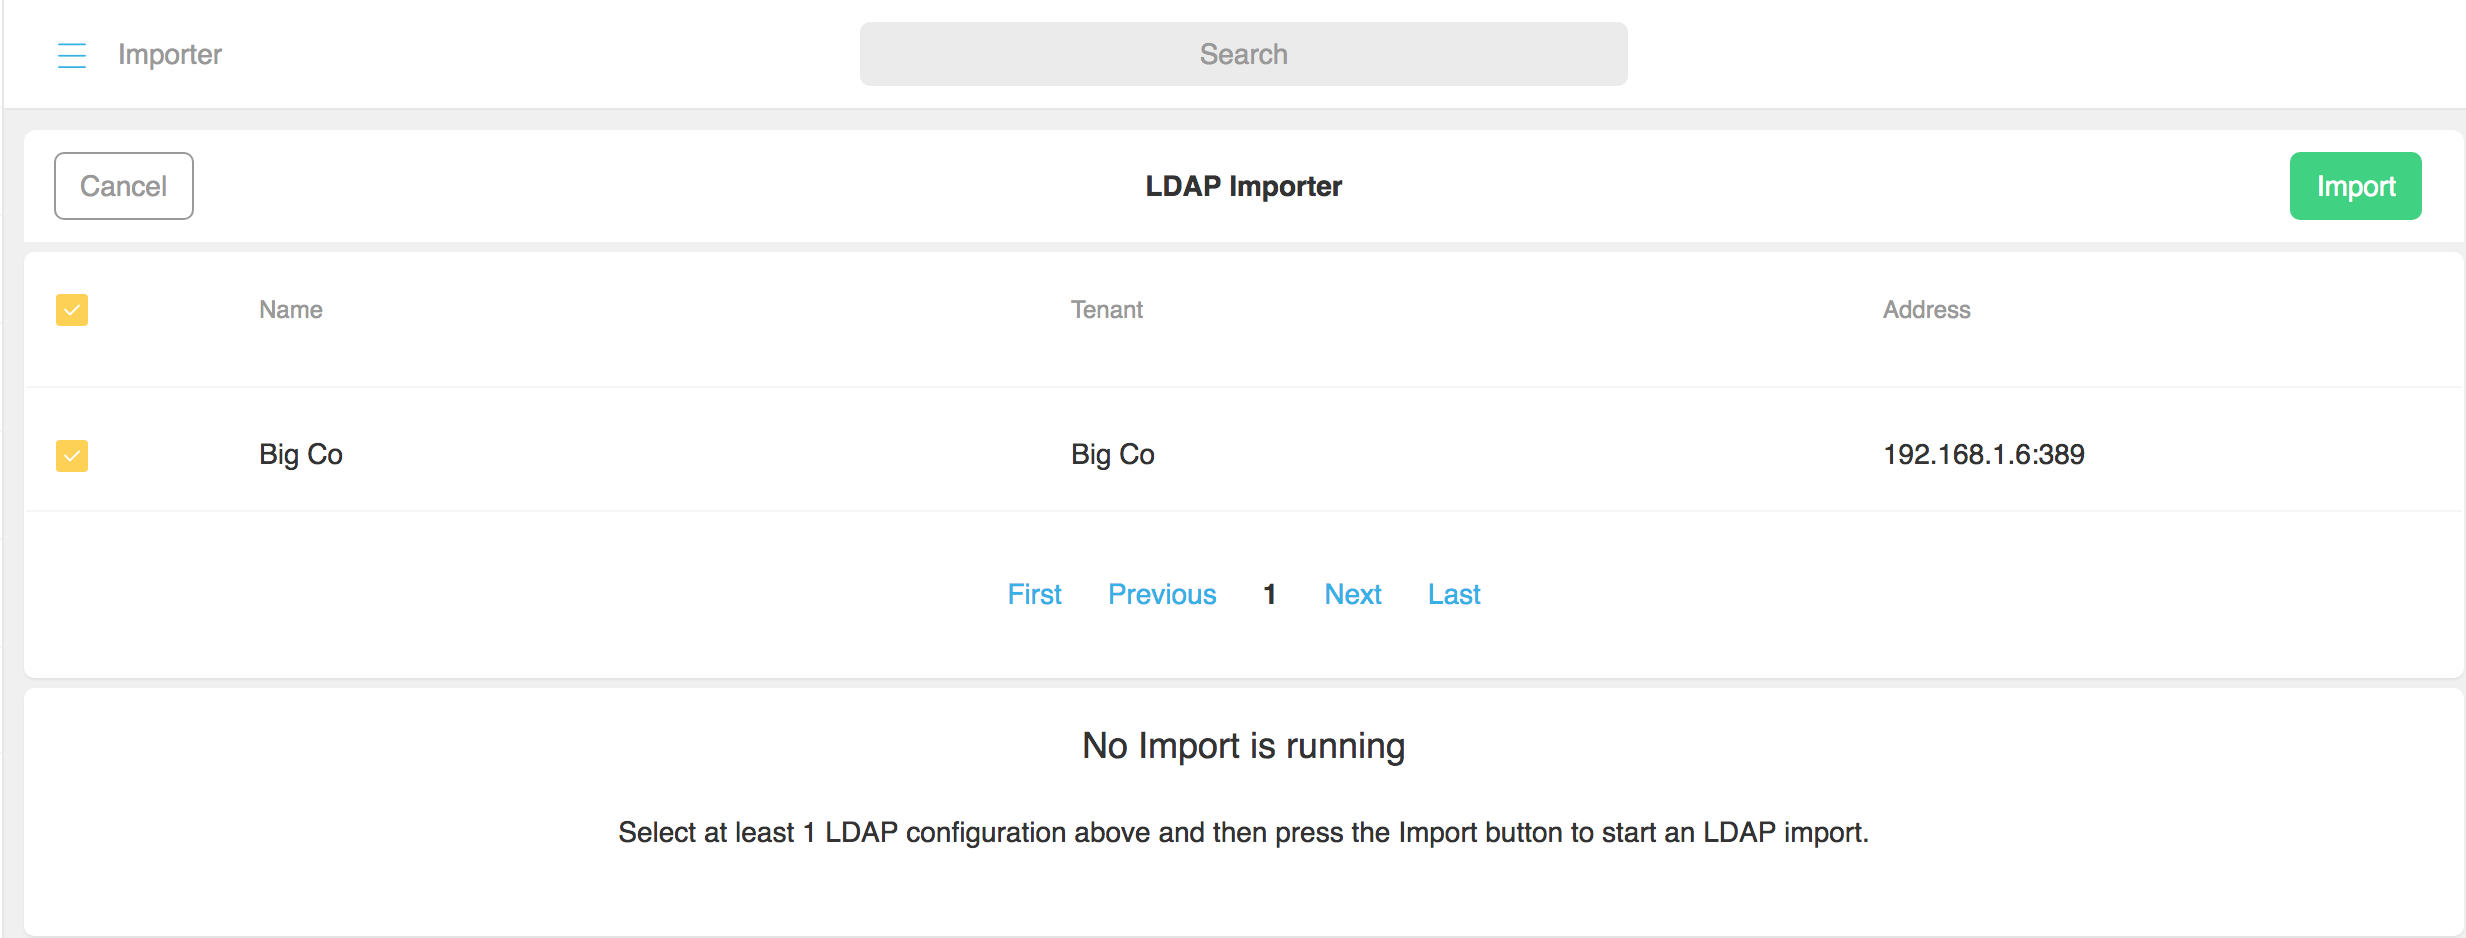
The LDAP Importer starts. The Importer Log files display as the Importer runs.
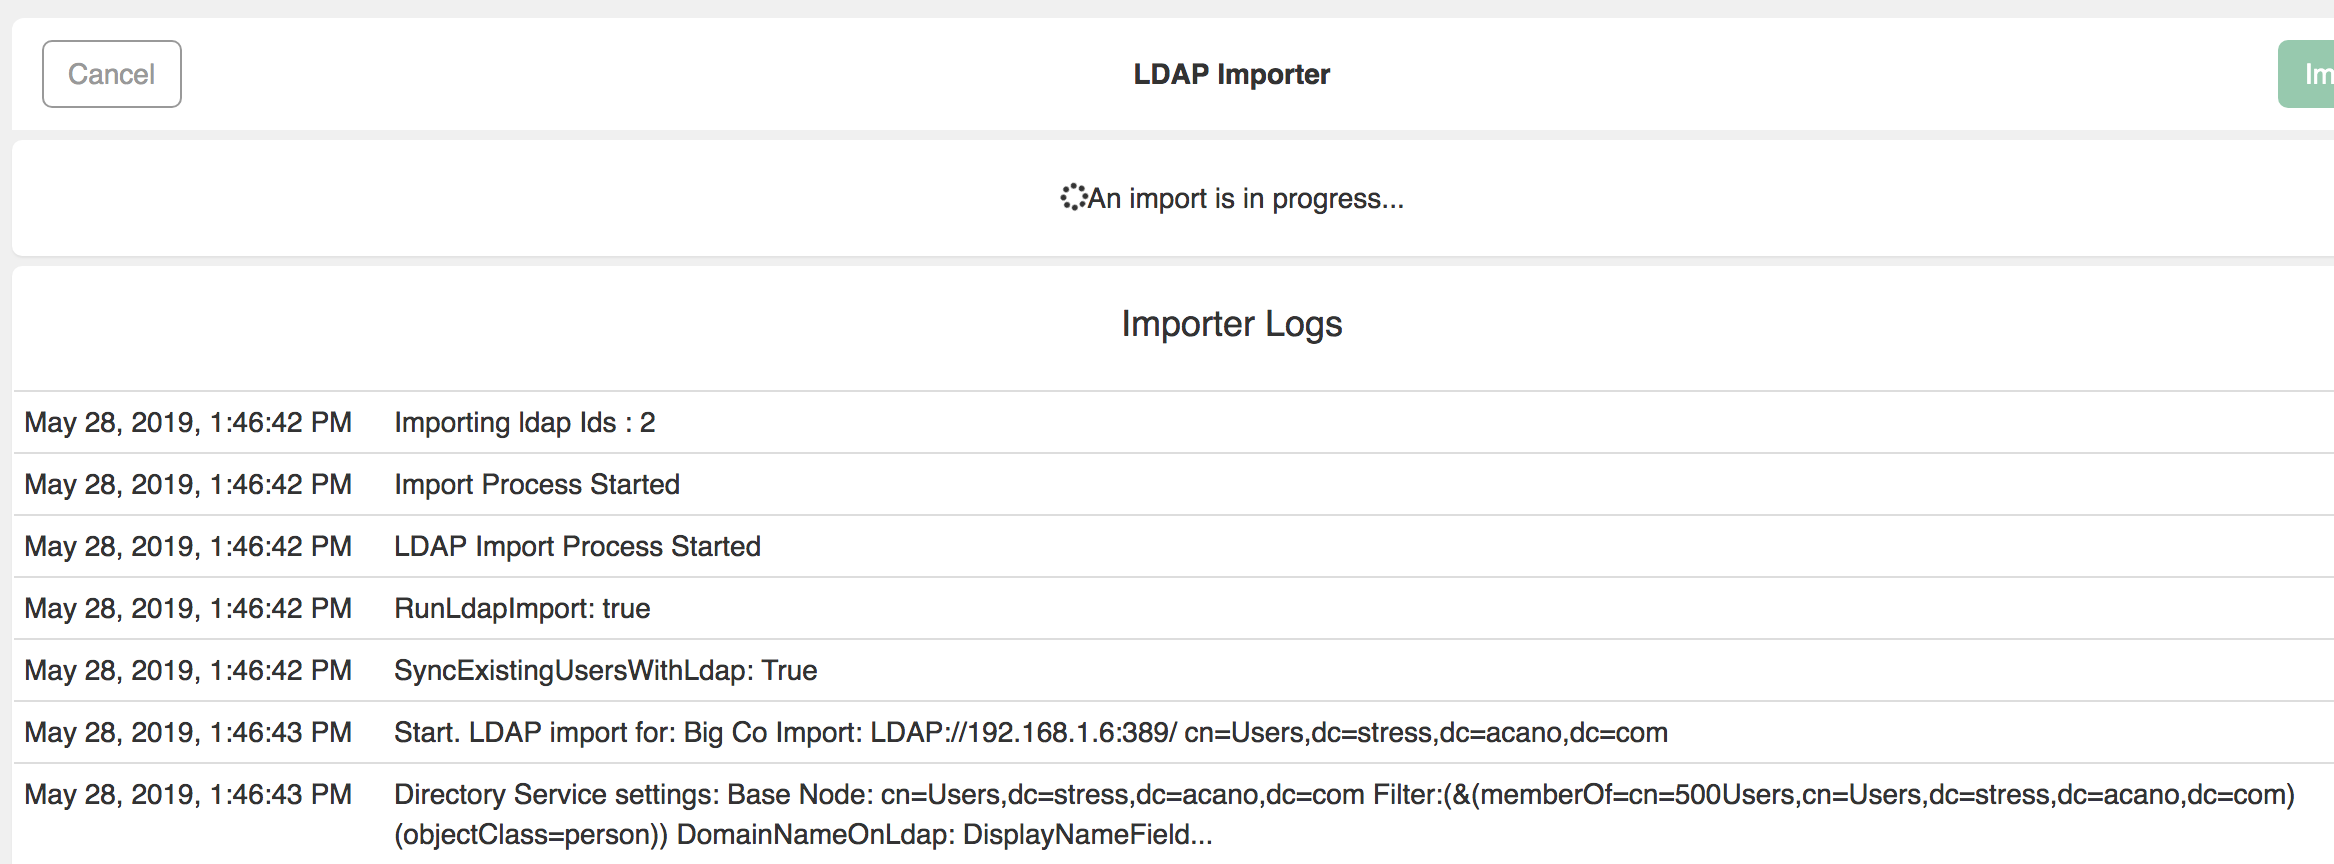
The logs provide an extensive breakdown of the import events and any import errors.
Examples of data which is contained within the log files includes:
- Duplicate log in names
- Duplicate URI’s/and Spaces
- Invalid LDAP attributes
- Invalid attribute transforms/invalid LDAP credentials
- Unable to connect to LDAP server warning
The LDAP Import Complete message is displayed once the Import process has run.

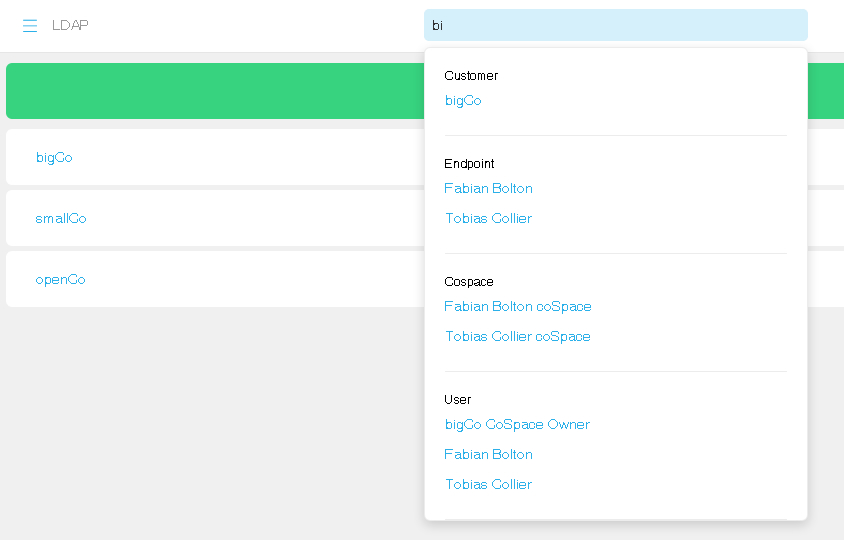
Having run the LDAP Importer, search as before to confirm that:
- There are users and endpoints for “BigCo” – the users/endpoints coApp on the Tenant now makes this much easier
- The page now displays users for “BigCo”
Importing users for a second Tenant
Having undertaken the import process for users for one tenant, you can repeat the process for a second tenant.
Importing different groups of users into a Tenant
VQ Conference Manager allows multiple LDAP Configurations to be defined per Tenant. This allows different groups of users to be imported from LDAP with different UX Profile types. A simple example would be importing one group of users as user type "User" and another group as user type "Operator".
Deleting users
The VQ Conference Manager LDAP Importer process deletes any user (and associated endpoints and, if created by VQ Conference Manager, Spaces and Space Members) IF the user is not found on LDAP during the LDAP Importer process.
Bulk delete can therefore be achieved by setting a filter that doesn’t match anything on the LDAP server. This results in Space not getting any users back from LDAP and therefore deleting all the users and associated endpoints.
Deleting users example – deleting all “BigCo” users
In the first example, we imported users from “BigCo”. In this example, users from Group 2 were being imported.
Note: This is a test set of data and your LDAP server will have a different schema.
To delete all the Group 2 (“BigCo”) users:
-
Change the filter field on the LDAP details screen from Group 2 to Group 2x


- Select Save
- Run the importer
All “BigCo” users get deleted. In this first example, only “BigCo” users had been imported, so by changing the filter, there are no matches and all users on VQ Conference Manager , and their associated endpoints, Spaces and Space Members are deleted.
To reload the Group 2 (“BigCo”) users:
- Change “Group2x” back to “Group2
- Select Save
- Run the importer
All “BigCo” users get imported (and associated Spaces, if Create Spaces on LDAP import box is checked on the LDAP details screen.)
Call Id and URI Auto-Increment keyword
Support for a new keyword has been added to the LDAP settings page.
This allows the Call Id value to be shared across multiple fields (specifically, primary URI, secondary URI and Call Id). It will work with the multi-role URI/Call Id fields as well.
- The format of the keyword is “xx%AI(6)%yy”
- The AI = “Auto Increment” – (add one)
- %% are the keyword delimiters
- xx are optional pre fix values
- yy are optional post fix values
- 6 defines the length of the number required – it generates a Call Id of 6 chars long and pads to the left with zeros. If the value becomes longer than 6 characters, it auto extends to the new length (e.g. 7)
- The base value for the Call Id is 1
- If you reference %AI(6)% multiple times on the same LDAP settings definition, the same value is used for all fields. The counter increments for the next user
- You can therefore, for example, use %AI(6)% for the Secondary URI and Call Id
- The result of that would be that users could direct dial into a space via the secondary URI or via the IVR and use the Call Id
- The (pre AM 2.3 MR1) Call Id is generated in the following manner:
- The base value is 1; it is incremented for each new Space created. In addition, a configurable prefix of 700 is defined. Call Ids therefore have values 7001, 7002 etc.
- The new model (from 2.3 MR1 onwards) gives you complete control:
- 666%AI(6)% - would give you values: 666000001, 666000002, 666000003 et.
- 666%AI(6)88 - would give you values 66600000188, 66600000288, 66600000388 etc
- The value generated by the auto incrementer (“AI”) is stored on the Space. This means if you needed to change a prefix, we can detect the change. So, for example, if you had a Space 666%AI(6)%88 and needed to change 666 to 777, you could
- original: 666%AI(6)%88 generating Space CallID 66600000188
- updated to: 777%AI(6)%88 Space would be updated at next import to have Call Id 77700000188
- and rerun the importer; we’d detect that 666 had changed, we’d retain the AI value(1) and update the Space to have Call Id (or P-URI, S-URI) of 77700000188
- It will also work with existing Call Ids that used the 700 prefix. If that’s required, you can use 700%AI(0)%
- The effect of that (assuming you haven't changed the 700 prefix via a configuration change) would be to allow you to use the existing Call Id and drop it into, for example, the primary or secondary URIs. This will be useful in scenarios where Call Ids are already known and you want, for example, to allow direct dialing
Extensions to the Auto-Increment keyword
The Auto-Increment keyword has been extended to allow multiple inner (as in within the %% pair) prefixes to be defined and to automatically move thru the prefix list as the auto-increment value wraps around (based on its length).
For example, suppose we have a network where Call Ids must be 6 digit and have an available set of 2 digit prefixes of 66, 67 and 68. The Auto- Increment length field is set to 4 which will result in 6 digit Call IDs. This would be defined as follows: %66,67,68AI(4)%
The AI keyword will generate values in the range 0000-9999 and append that to the prefixes. It starts with the first prefix in the list (66) resulting in values in the range 660000-669999. When the 4 digits wrap around back to zero, they are then appended to the next prefix in the list (67) to produce values in the range 670000-679999. The process repeats with 680000-689999.
When the list of prefixes has been consumed and the counter reaches (in this example, 9999), the next number generated will overflow to 5 digits. We would therefore see 689999 followed by 6810000.
The updated AI keyword remains compatible with previous versions; it is therefore still valid to prefix or postfix the AI keyword in this style: 1000%66,67,68AI(4)%
Or
%66,67,68AI(4)%1000
The thing to be aware of and not to get caught out by is having a sufficient range of numbers so that you don't run out them. So, for example, a 4 digit Auto-Increment length might sound a lot but its only 9999 values - a big system could consume that range quite quickly if Spaces are being created frequently via the user interface. What we tend to see is that customers install VQ Conference Manager and during the commissioning and proof of concept phases, do a lot of experimentation as they work out what they want to do and what their users like. By the time their service goes live, the remaining set of numbers in the 4 digit range can be quite small.
Our normal recommendation would, therefore, to consider using at least 6 digits for the Auto-Increment length. We plan to refine the Auto-Increment further in a future release and enable wrap-around and re-use of unused values in the range.
Support for Secondary Call Ids (from AM 2.4.1/VQCM 3.1)
A Secondary Call Id has been added to the LDAP Configuration and Space Template pages. The Secondary Call Id allows, for example, short Call Ids to be defined for easier access to Spaces. In some customer environments, long Call Id values were being imported from LDAP and, whilst they worked, they became a usability pain-point for users caling into calls. The Secondary Call Id allows the value from LDAP to be transformed, the first xx digits truncated and a ‘short dial’ option made available on the Space.
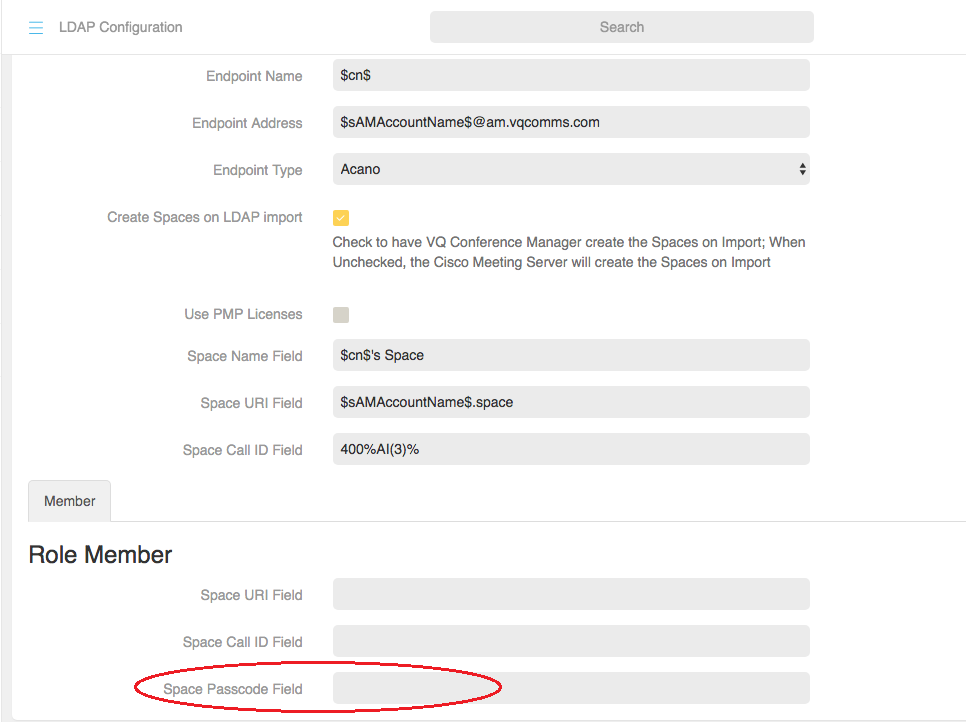
Setting Space PINs from LDAP attributes on LDAP import
You can import passcodes from LDAP/AD directly by completing the Space Passcode field on Role Type for an LDAP config. Navigate to System>Tenant>LDAP Configuration.
"Sync with Call Bridge" option
In some cases, (see below), CMS will need to be configured without users. Normally, as part of the LDAP import process, VQCM issues a "Synchronize" command to CMS that instructs CMS to connect to AD/LDAP and re-synchronize (create, update, delete) users and (optionally) Spaces.
Normally, this option will be checked and VQ Conference Manager will issue a synchronize command to CMS.
Disabling Synchronization is required if:
• You do not want to provision users on your Call Bridge (CMS)
• You are using a LDAP server that is not compatible with your Call Bridge (CMS)
• VQ Conference Manager with Windows Authentication Single Sign-On (“SSO”) is required
Note: VQ Conference Manager 3.0 is not available on the Windows platform. See "VQ Conference Manager on Windows" in the Introduction.
• User Identities that do not contain a Domain are required (for example, with SSO)
With this option not-checked, VQ Conference Manager does not issue a Synchronize command to the Call Bridge (CMS) as part of the LDAP import process.
The Synchronize command instructs the Call Bridge (CMS) to connect to LDAP and import users and, optionally, create Spaces.
By not sending the Synchronize, the result is that no Users will be imported by the Call Bridge (CMS).
In the process below, when the original LDAP Settings are deleted from VQ Conference Manager, the associated LDAP Settings on the Call Bridge (CMS) are deleted which results in any Users associated with the LDAP and any Spaces also being deleted by the Call Bridge.
Please discuss your requirement with support@vqcomms.com before Disabling the “Sync with Call Bridge” setting. Disabling this mode, for example, prevents use of the CMA client.
