Space Templates and Passcodes
Overview
There are three pre-configured Space Templates within VQ Conference Manager; Huddle Room, Managed Meeting and All Hands. The Templates determine the call experience for each participant. For example, the maximum number of participants, call quality and whether chat is enabled/disabled.
The following table describes the pre-configured Template types.
| Template Type | Description |
|---|---|
|
Huddle Room |
An informal meeting in which there is only one role. All attendees of the meeting access the meeting using the same pass code and everyone is allowed to share their screen, mute others, record or end the call. The call is encrypted by default. |
|
Managed Meeting |
A more formal type of meeting which has two roles; a meeting manager (activator) who controls the meeting and participants who attend the meeting. Meeting managers and participants enter the Space using different pass codes and the meeting cannot start until the Meeting manager joins the call. (This activation moves a user from a virtual "lobby" into the meeting room.) |
|
All Hands |
A formal company wide meeting with 3 roles; a moderator for those who manage the meeting, a panel member role for the hosts and a participant role for the "audience" of the meeting. |
Table 1: Space Template descriptions
Note: VQ Conference Manager also contains definitions for a Default Space Template. This is a special case. It is used for Spaces created outside of VQ Conference Manager (for example, via the CMA Client), and ensures that within VQ Conference Manager, externally created Spaces are represented with the full set of data that VQ Conference Manager expects. Examples of this are things like access methods and callLegProfiles. The data isn't used in the sense that VQ Conference Manager doesn't update it. It does mean, however, that the software within VQ Conference Manager can be much cleaner, because it doesn't have to consider the case of "Do I need to check this data is present because the Space was created outside VQ Conference Manager"; VQ Conference Manager can essentially work with a set of default, or safe, values.
The following table shows the attributes and values for each of the pre-configured Space Templates.
|
Huddle Room |
Managed Meeting |
All Hands |
Editable when Scheduling |
|
|---|---|---|---|---|
|
ACL Tag |
System |
System |
System |
No |
|
Description |
A simple huddle room |
A managed meeting |
Appropriate for big, managed meetings |
No |
|
Participant Limit |
20 | 20 | 1000 | Yes |
| Disable Chat | No | No | No | Yes |
| Recording | Manual | Manual | Manual | Yes |
|
Streaming |
Manual | Manual | Manual | Yes |
| Passcode |
Passcode Mode Timeout |
Passcode Mode Timeout |
Passcode Mode Timeout |
Yes |
|
Passcode Timeout 10 secs |
Passcode Timeout 10 secs |
Passcode Timeout 10 secs |
Yes | |
| Space member role* | Member |
Participant** |
Participant** |
Yes |
| Invitation role* | Member | Participant | Participant | Yes |
| Blank URI Mode | Use Invitee Names | Use Invitee Names | Use Invitee Names | No |
| Duplicate URI mode | Append value to URI | Append value to URI | Append value to URI | No |
| Space Member permissions |
Enable ability to send messages Enable ability to delete all messages |
Enable ability to send messages Enable ability to delete all messages |
Enable ability to send messages Enable ability to delete all messages |
Yes |
Table 2: Space Template values
Specific Role Types are also pre-configured for each Template. These determine the roles the user can play and the tasks they can perform, within each Space. For example, Participants can join the Space and take part in the call, whilst Moderators manage the meeting.
Please Note
*In earlier versions Member and Invitation Role were a single value: Default Role.
However, as more users started to use the CMA client, it became apparent that we needed more granularity. The problem we faced was that when users clicked the “Invite” button on the CMA client to get the Space details, they were getting the PIN for the host rather than, for example, a Participant.
With separate values, we are now able to define the Role for a Member of the Space and the Role to be used when the “Invite” button is clicked on the CMA client. The Member Role can be defined, for example, as Meeting Manager and the Invite Role can be defined as Participant. Clicking the Invite button on the CMA client therefore produces the dial in (and PIN/passcode) information for the Participant Role.
The Role of a call participant is controlled in a number of ways. If the participant is joining the call from a CMA client, the identity of the participant is known and the participant will either be a known member or a guest. If the Participant has joined the call from a normal device (e.g., SIP or Skype For Business), the participant is identified by one of several ways:
1. The PIN/passcode they enter
2. The Call Id they provide
3. The URI dialed
Please also note that there is a special case when using the CMA client – if the user uses the “call” button to place the call, they join the call as if they were a standard SIP client – their Role is identified by the PIN/passcode, URI or Call Id entered.
** When the Default Role property was separated into Space (formerly coSpace) Member and Invitation Roles in AM 2.3, the Roles used for Space Member and Invitation Roles for each of the pre-configured Space Templates was set as shown in the Space Template values table above. This was done to ensure that existing systems performed in the same way and user’s didn’t experience unexpected changes.
It does mean, however, that the values for Space Member and Invitation Roles can’t be changed on the pre-configured Space Templates because they are system defined and read-only.
In environments where the CMA client is being used and users are being created with multi-role Space Templates, you will normally want to change the Space Member value to that of the Host or Meeting Manager. The Invitation Role will normally be left as Participant.
To change the value of Space Member or Invitation Role, please create a new Space Template and Role Types. When importing users via LDAP, use the Space you have created in the LDAP Configuration Settings fields. These settings control the template used when a Space is created as new users are imported. As a general rule, we recommend that you create your own copies of VQ Conference Manager's Space Templates; this means if you need to change values sometime later, you will not then face the issue of the pre-configured Space Templates being read-only.
Viewing Space Templates
The Space Templates are viewed and created from the Space Template coApp. Navigation to this is from System>Space Template.
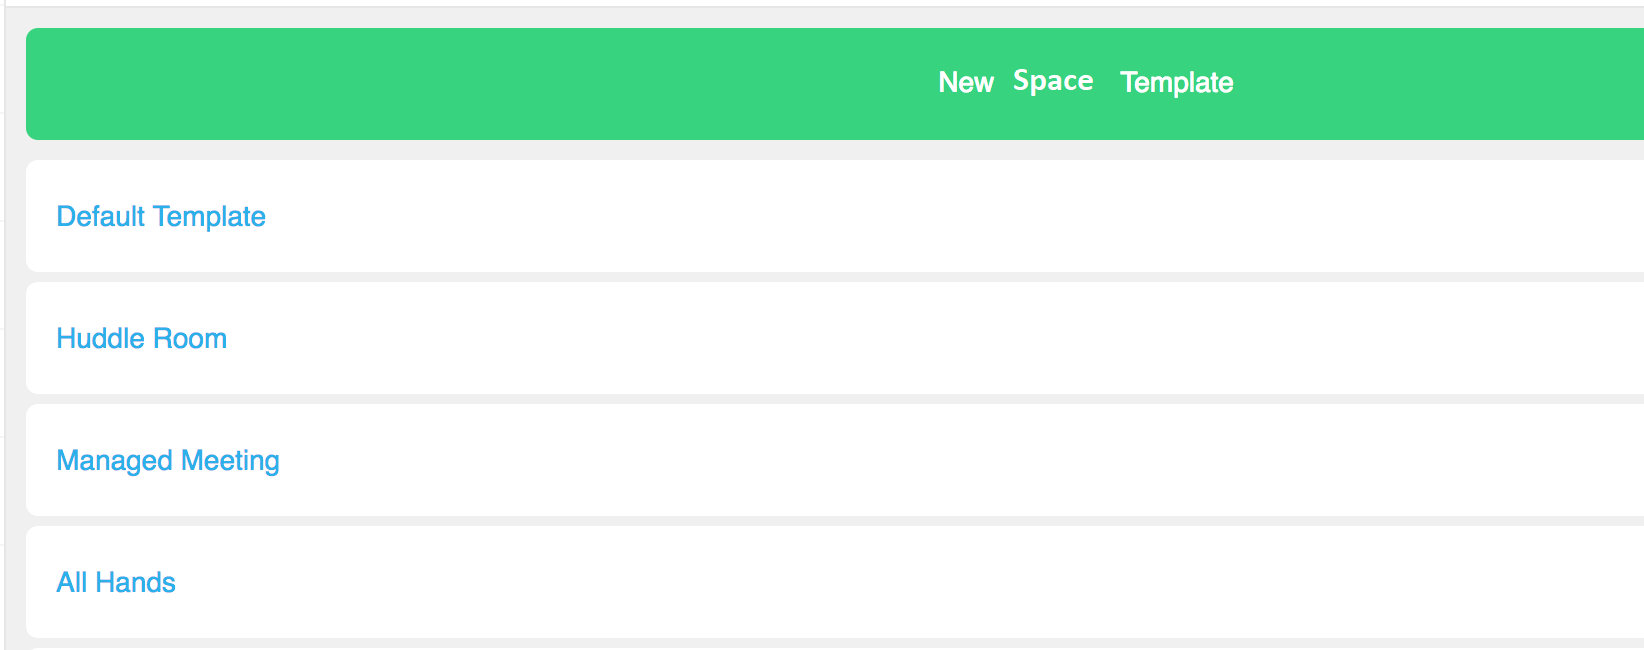
Select the Space Template you want to view and the properties for the Template and Role Type will display in the subsequent pages.
Viewing Role Types
The Role Types are viewed and created from the SpaceTemplate coApp. Navigation to this is from System>Space Template.
There are 5 pre-configured Role Types which are associated with the relevant Space Templates within VQ Conference Manager. The role type determines what the user can do within the call, as detailed in the following table.
|
Role Type |
Description |
|---|---|
|
Member |
A Space member who can join a call |
|
Moderator |
Moderators manage the call, are allowed to end the call and to mute participants. Moderators are encrypted |
|
Panel Member |
Panel Members contribute to the meeting and so are allowed to share their screen with the other participants |
|
Participant |
Participants cannot contribute to the meeting and so cannot share their screen and their audio is muted |
|
Meeting Manager |
Similar to a Moderator. Term used in the Managed Meeting Space Template |
Table 3: Description of Role Types
Creating Space Templates
It is envisaged that the default Templates will provide sufficient flexibility for most users. However, if new Space Templates need to be created, this is done from the Space Template coApp. Navigation to this is from System>Space Template.
This takes you to the Template list page. Each of the Space Templates can be viewed from this page. If the Space Template list is long, you can also search for the Space Template you require from the search field.

-
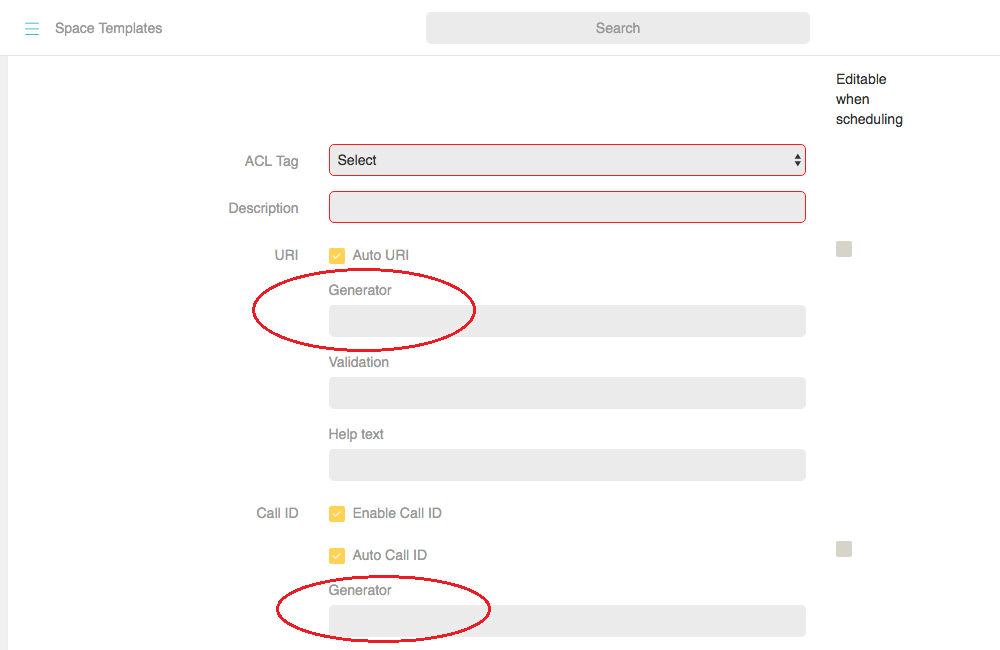
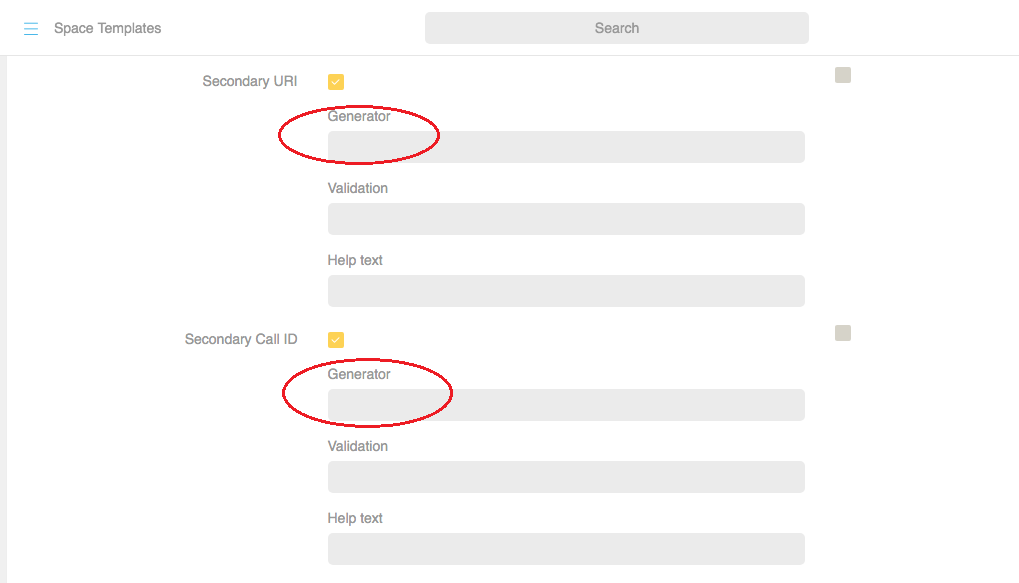
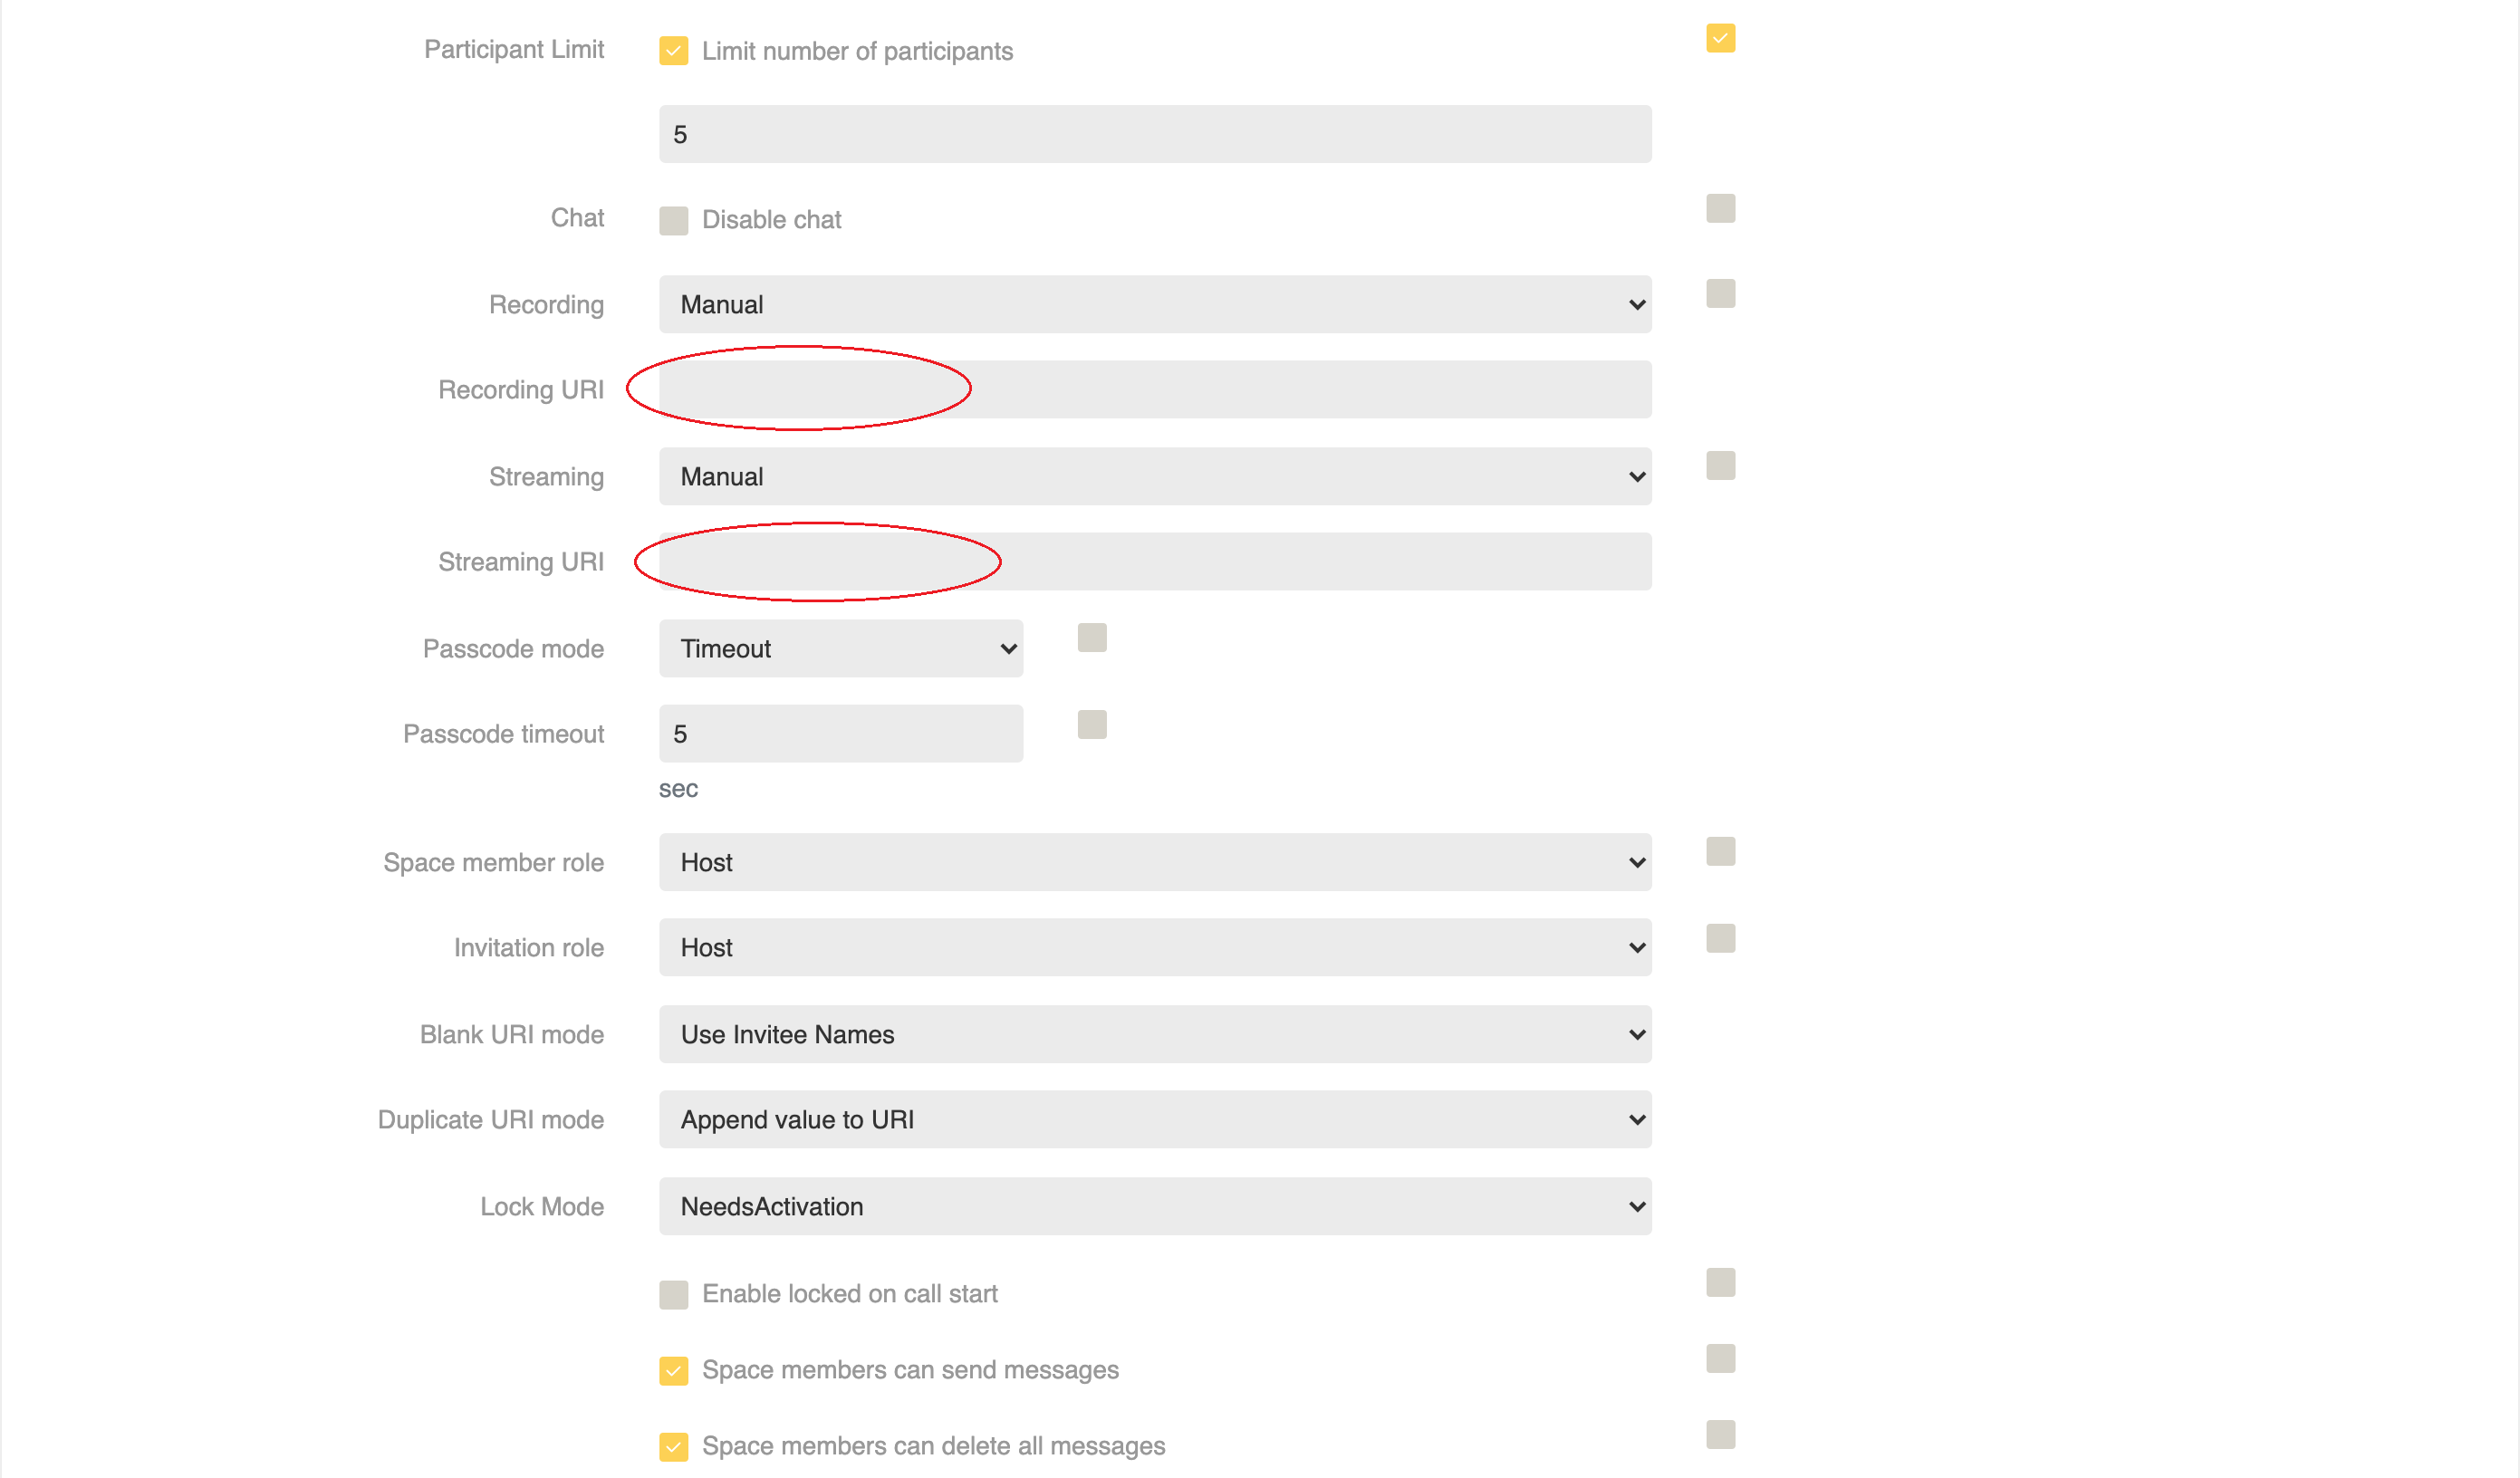
Select New Space Template. This takes you to the Create New Template screen. The ringed "Generator" fields are described later in this section
-
Complete the fields as required. Mandatory fields are marked with a red border
Field
Description
Title Space name ACL Tag
E.g. template available system wide (e.g.Everyone) or at the tenant level (e.g. Tenant name)
Description
Words to describe the type of template e.g. A spectator to the meeting
Auto URI It is sometime beneficial to have VQCM automatically generate URI values. This enables an Administrator to define the form of the resulting URI and ensures that the resulting URIs conform to a standard format and dialplan. Whenever a User or Operator creates a new Space (or call based on the Space Template), the URI (and Secondary URIs if enabled) will automatically pre-populate with URI values.
Checking the "Auto URI" checkbox results in "Generator" panels appeating for URIs and Secondary URIs.
URI Generator URI and Secondary URI Generator fields are enabled by checking the "Auto URI" check box; enabling URI generators results in the URI field being automatically generated by VQCM. For more details on the Auto Increment ("AI") and Random ("RND") Keyword, please read the "VQ Conference Manager Generator Keywords" document, available from vqcomms.com.
An example of URI generator is %RND(6)%.vmr is:
This example generates a 6 digit random URI with the postfix ".vmr"

Validation If a Validation Rule is defined, the validation rule will be applied to the URI value regardless of whether the URI is manually generated by the user or as the result of a Generator.
Validation rules are Regular Expressions (also known as "Regexes").
A basic example of a validation rule regular expression is “^.*\.vmr$” (a string starting with zero or more characters terminating in ‘.vmr’).
A more specific example is “^.{4,6}\.vmr$” (a string starting with between 4 and 6 characters terminated in ‘.vmr’).
An even more specific example is “^[a-zA-Z]{4,6}\.vmr$” (a string starting with between 4 and 6 upper or lower case letters of the alphabet (a-z) terminated in ‘.vmr’).
A good online test tool for testing regular expressions is:
http://derekslager.com/blog/posts/2007/09/a-better-dotnet-regular-expression-tester.ashx
If you need help with regexes, please contact support@vqcomms.com.
Help text e.g., Please enter your URI, ensuring it ends with ".vmr".
The URI entered is checked (Validated) using the Validation rule; if the validation fails, the "Help Text" message will be displayed to the user.
The validation field can be left blank.
Auto Call ID In the same way it is sometimes beneficial to have VQCM automatically generate URIs, it is sometimes useful to have VQCM automatically generate Call IDs.
Checking the "Auto Call ID" check box results in a "Generator" panel appearing under Call ID and Secondary Call ID.
Call ID Generator This panel will appear if "Auto Call ID" is checked. An example of Call ID generator is:

Validation The validation rule for Call ID values. Help text If the Call ID validation rule fails, this message will be displayed to the user. Secondary URI Check this box to enable Secondary URIs on Spaces of this type. Secondary URI Generator An example Secondary URI generator is:

Validation The validation rule for Secondary URI values. Examples are provided URI Validation above. Help text If the Secondary URI validation rule fails, this message will be displayed to the user. Examples are provided URI Validation above. Secondary Call ID Check this box to enable Secondary Call IDs. Secondary Call IDs can be useful, for example, if you require long (external users) and short dial-strings (internal users) for users to enter calls. Secondary Call ID Generator An example Secondary Call ID generator is:

Validation The validation rule for Secondary Call ID values. Examples are provided URI Validation above. Help text If the Secondary Call ID validation rule fails, this message will be displayed to the user. Examples are provided URI Validation above. Participant Limit
e.g. 20
Chat disable/enable Recording
Disabled, Automatic or Manual. This controls who this Space or ad hoc calls can be recorded. See note below.
Recording URI The Recording URI is intended to provide automated mechanisms for all Spaces defined on the Space Template. CMS will create the recording file on the target file system using the Space GUID and time stamp.
For more information, please consult the Cisco CMS documentation
Streaming Disabled, Automatic or Manual. See note below. Streaming URI The Streaming URI is intended to provide automated mechanisms for all Spaces defined on the Space Template. CMS will create the streaming file on the target file system using the Space GUID and time stamp.
For more information, please consult the Cisco CMS documentation
Streaming:
https://www.cisco.com/c/en/us/support/docs/conferencing/meeting-server/211261-Configure-and-Troubleshoot-CMS-live-stre.html
Passcode
mode
Required, Timeout. See note below. Passcode Timeout See note below. Space member role The Space member role is the role assigned when the owning user is added as a member to the Space when the Space is created during the LDAP import process. This enables, for example, a multi-role template to be used and to define the Space owner as being a Host member. When the user joins the call using the CMA client, they assume this role. Invitation role Invitation role identifies the role that will be used by the CMA client when a CMA user clicks on the "INVITE" button to generate dial-in information for the Space (URI, PIN etc), that can be mailed to invitees. The default value of Invitation role will be that of Space member role (formerly Default role), so that previous behaviour is preserved. Blank URI Mode If you schedule a call and don't specify the Space, VQ Conference Manager creates a dynamic Space for you.
You can choose how the dynamic Space will named. The options are the Invitee Names, Call Name/Space Name or you can select not to allow Blank URI's.
Duplicate URI Mode This field enables you to define the action to take if you have a URI clash. In "Append value to URI" mode, the software will detect a clash and automatically create a non-clashing value, by appending a post-fix to the URI. In "Always Error" mode, the clashing URI will generate an error message. Space Member Permissions You can allow or deny the ability to enable/disable send messages and delete messages. Table 4: Space Template fields.
- Select Done
Space Template URI's and Call ID's
You can specify URI's and Secondary URI's, Call ID's and Secondary ID's to fit with your own dial plans. This is done from System>Space Template>New Space Template and completing the fields marked above and shown in the Space Template table.
Recording, Streaming and Passcode Mode
Note: The Recording, Streaming and Passcode Mode fields have options which are explained below.
Recording. CMS API “recordingMode”
Controls how this Space or ad hoc calls can be recorded.
- Options: disabled, manual, and automatic
- Disabled - call is not recorded
- Manual - users can start/stop recording
- Automatic - call is automatically recorded and users cannot start/stop recording
- Default value: "manual"
Streaming. CMS API “streamingMode”
Controls how this Space or ad hoc calls can be streamed.
- Options: disabled, manual, automatic
- Disabled - call is not streamed
- Manual - users can start/stop streaming
- Automatic - call is automatically streamed and users cannot start/stop streaming
- Default value: "manual" (From CMS version 2.1)
Passcode Mode. CMS API “passcodeMode”
Determines the behavior for passcode entry when a mixture of blank and set passcodes can be used to access a Space via the same URI/call Id.
- Options: required, timeout
- Required - requires passcode to be entered, with blank passcode needing to be explicitly entered
- Timeout - after an amount of time has elapsed with no passcode being entered, interpret this as a blank passcode. Amount of timeout is determined by value of "passcodeTimeout"
Passcode Timeout. CMS API “passcodeTimeout”
If specified, this is the amount of time, in seconds, that the Call Bridge will wait before interpreting passcode as a blank passcode (if "passcodeMode" is set to "timeout"). Timeout time is measured from the end of the passcode prompt.
- Numeric value
Recording URI
At VQCM 3.7, we added the Recording URI to Space Templates.
The Recording URI is intended to provide automated mechanisms for all Spaces defined on the Space Template. CMS will create the recording file on the target file system using the Space GUID and time stamp.
For more information, please consult the Cisco CMS documentation
Streaming URI
At VQCM 3.7, we added the Streaming URI to Space Templates.
The Streaming URI is intended to provide automated mechanisms for all Spaces defined on the Space Template. CMS will create the streaming file on the target file system using the Space GUID and time stamp.
For more information, please consult the Cisco CMS documentation
Streaming: https://www.cisco.com/c/en/us/support/docs/conferencing/meeting-server/211261-Configure-and-Troubleshoot-CMS-live-stre.html
Editable fields
Certain fields on the Create New Template page, (as indicated on the screen shot,) can be made editable when calls are scheduled. However, the intention behind Templates is that they make the user experience predictable and do not expose users to large numbers of options. Making a setting “editable” allows the users to change a value. It is recommended that this functionality is used sparingly.
Creating Role Types
New Space Templates are created from the Space Template coApp. Navigation is from System>Space Template.
You can create a new Role Type when you create a new Space Template or can also add new Role Types to existing Space Templates. The process is the same for both.
Note: Please see the CMS Call Bridge documentation for the individual properties available on each Role. VQ Conference Manager's Role properties map onto Call Leg Profiles on the Call Bridge.
-
Select the Space Template you which want to add new Role Types
-
Select the New Role icon
Complete the fields. Mandatory fields are marked with a red border and are Meeting Role Name and Description. The fields below define what a user with this Role will experience during a call. The boxed fields are explained later in this section
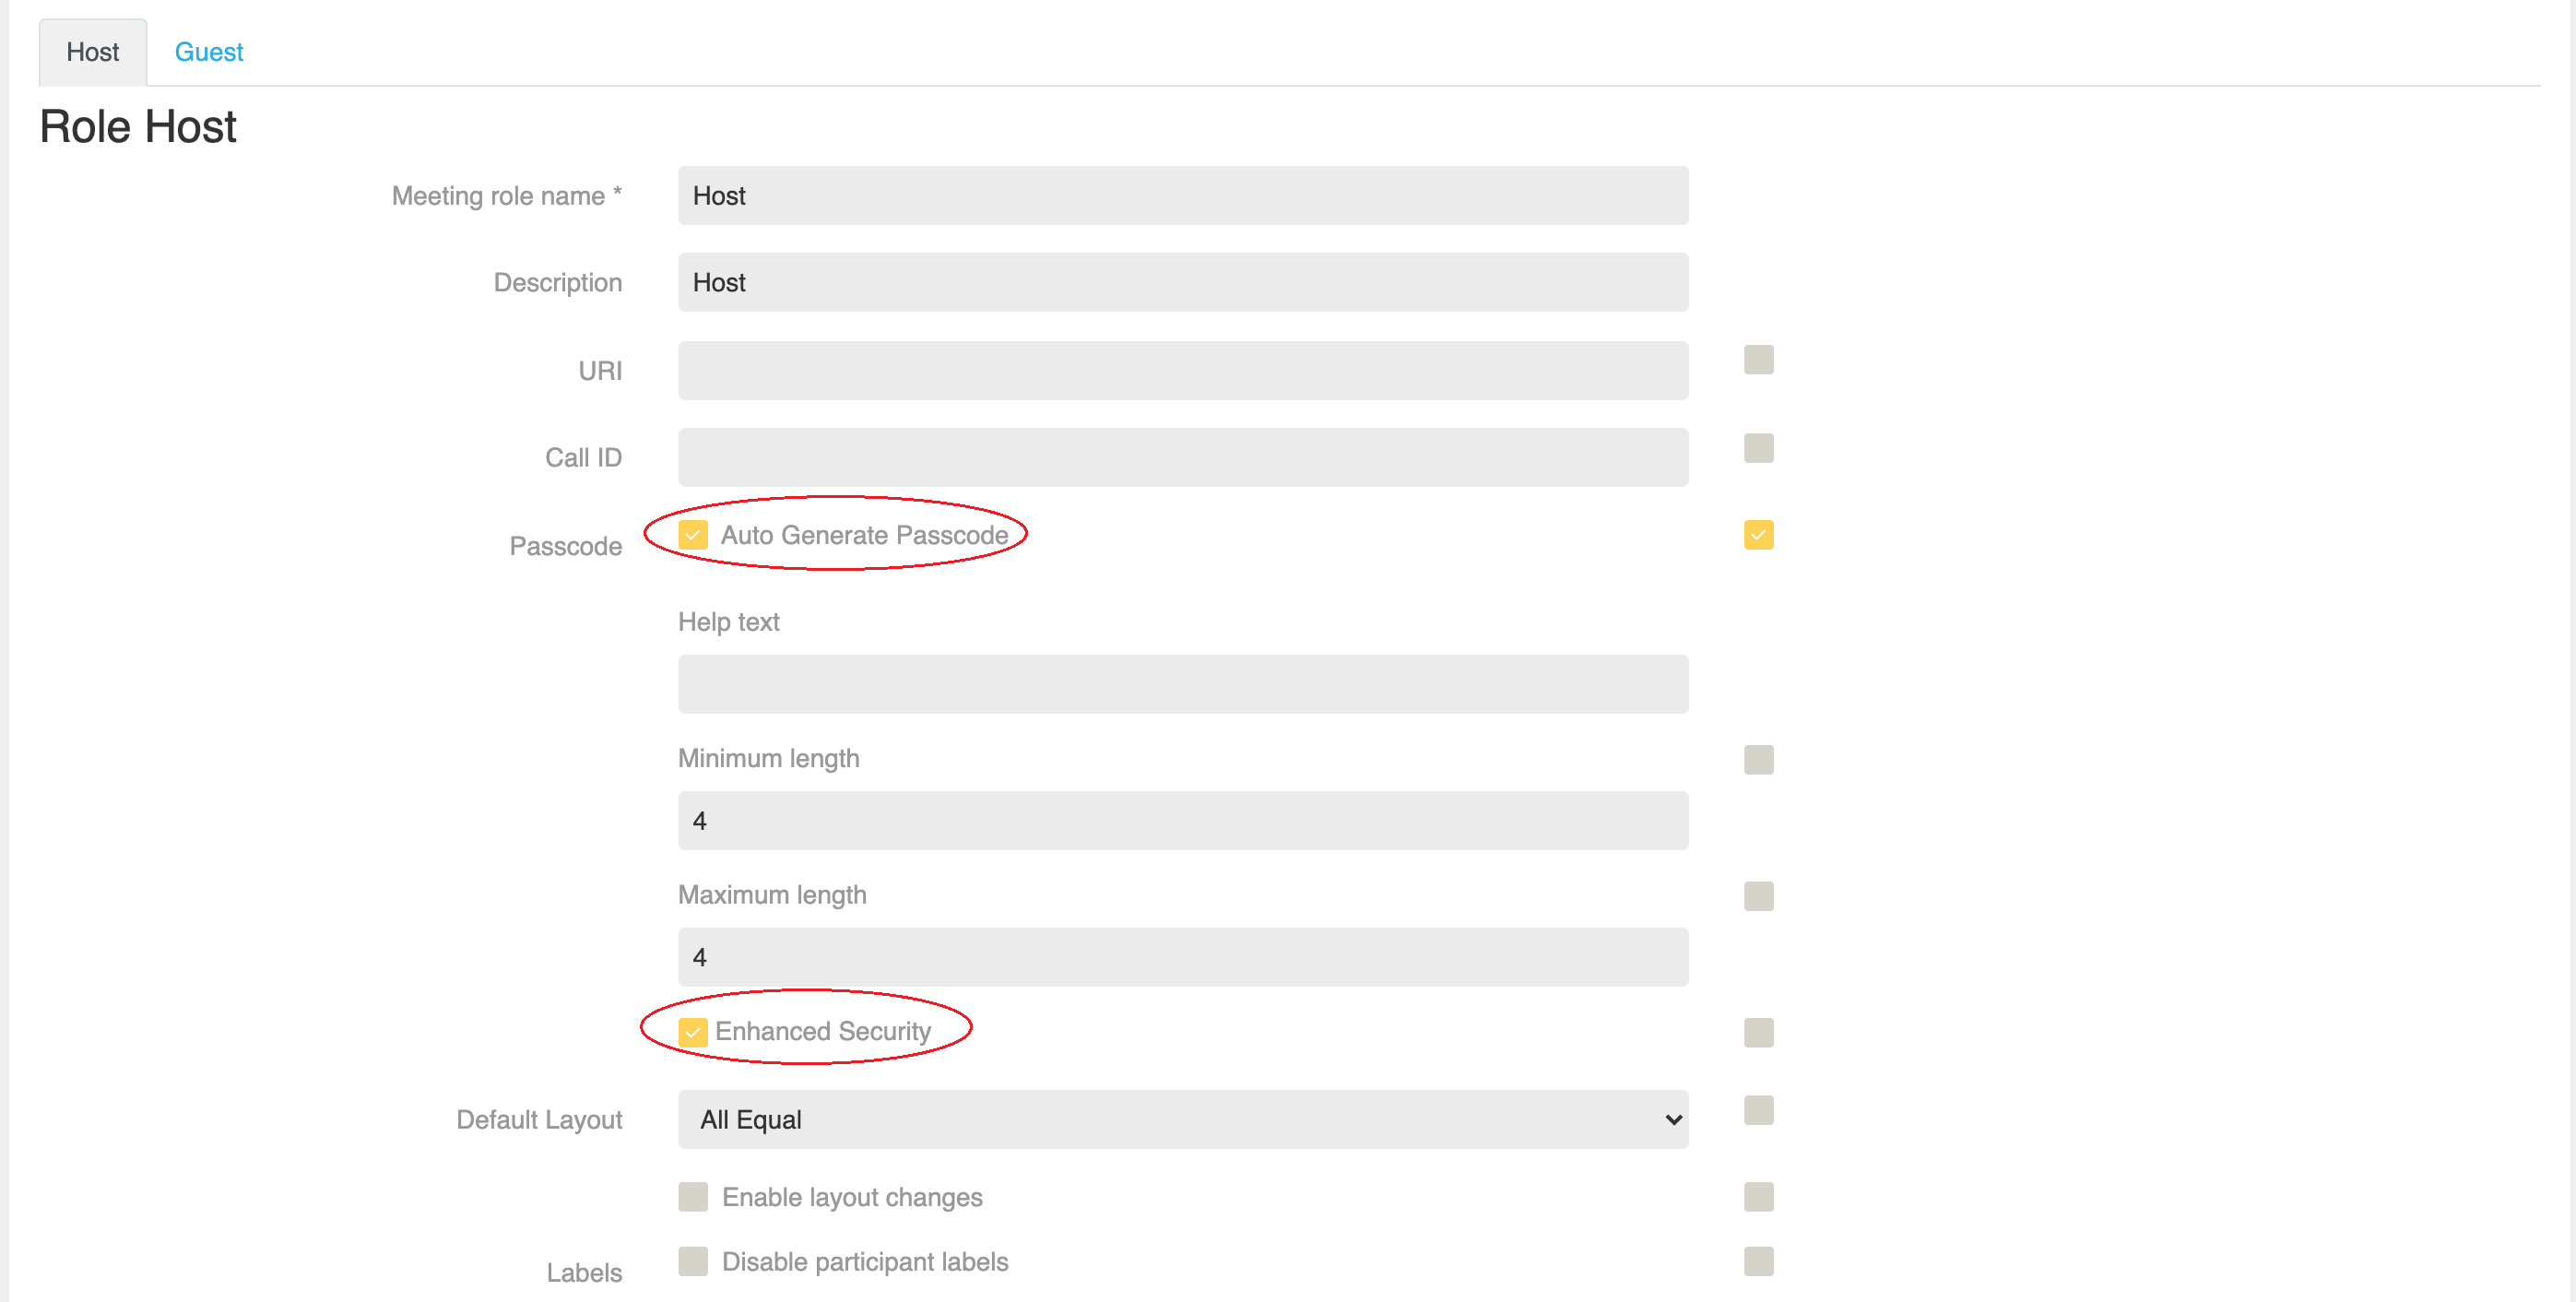
Passcode "Auto Generate"
If checked, a Pin/passcode will automatically be generated. If the "Edit" option is checked, the user will be able to update the passcode. The min/max length values will be used to check the input. Help text will be displayed to guide the user if the passcode validation fails.
Enhanced Security
Checking the Enhanced Security option enables you to check for incremental digits i.e.1,2,3,4, decremental digits, i.e. 4,3,2,1, and repeated digits i.e.1,1,2,3.
New Properties on Space Template/Roles
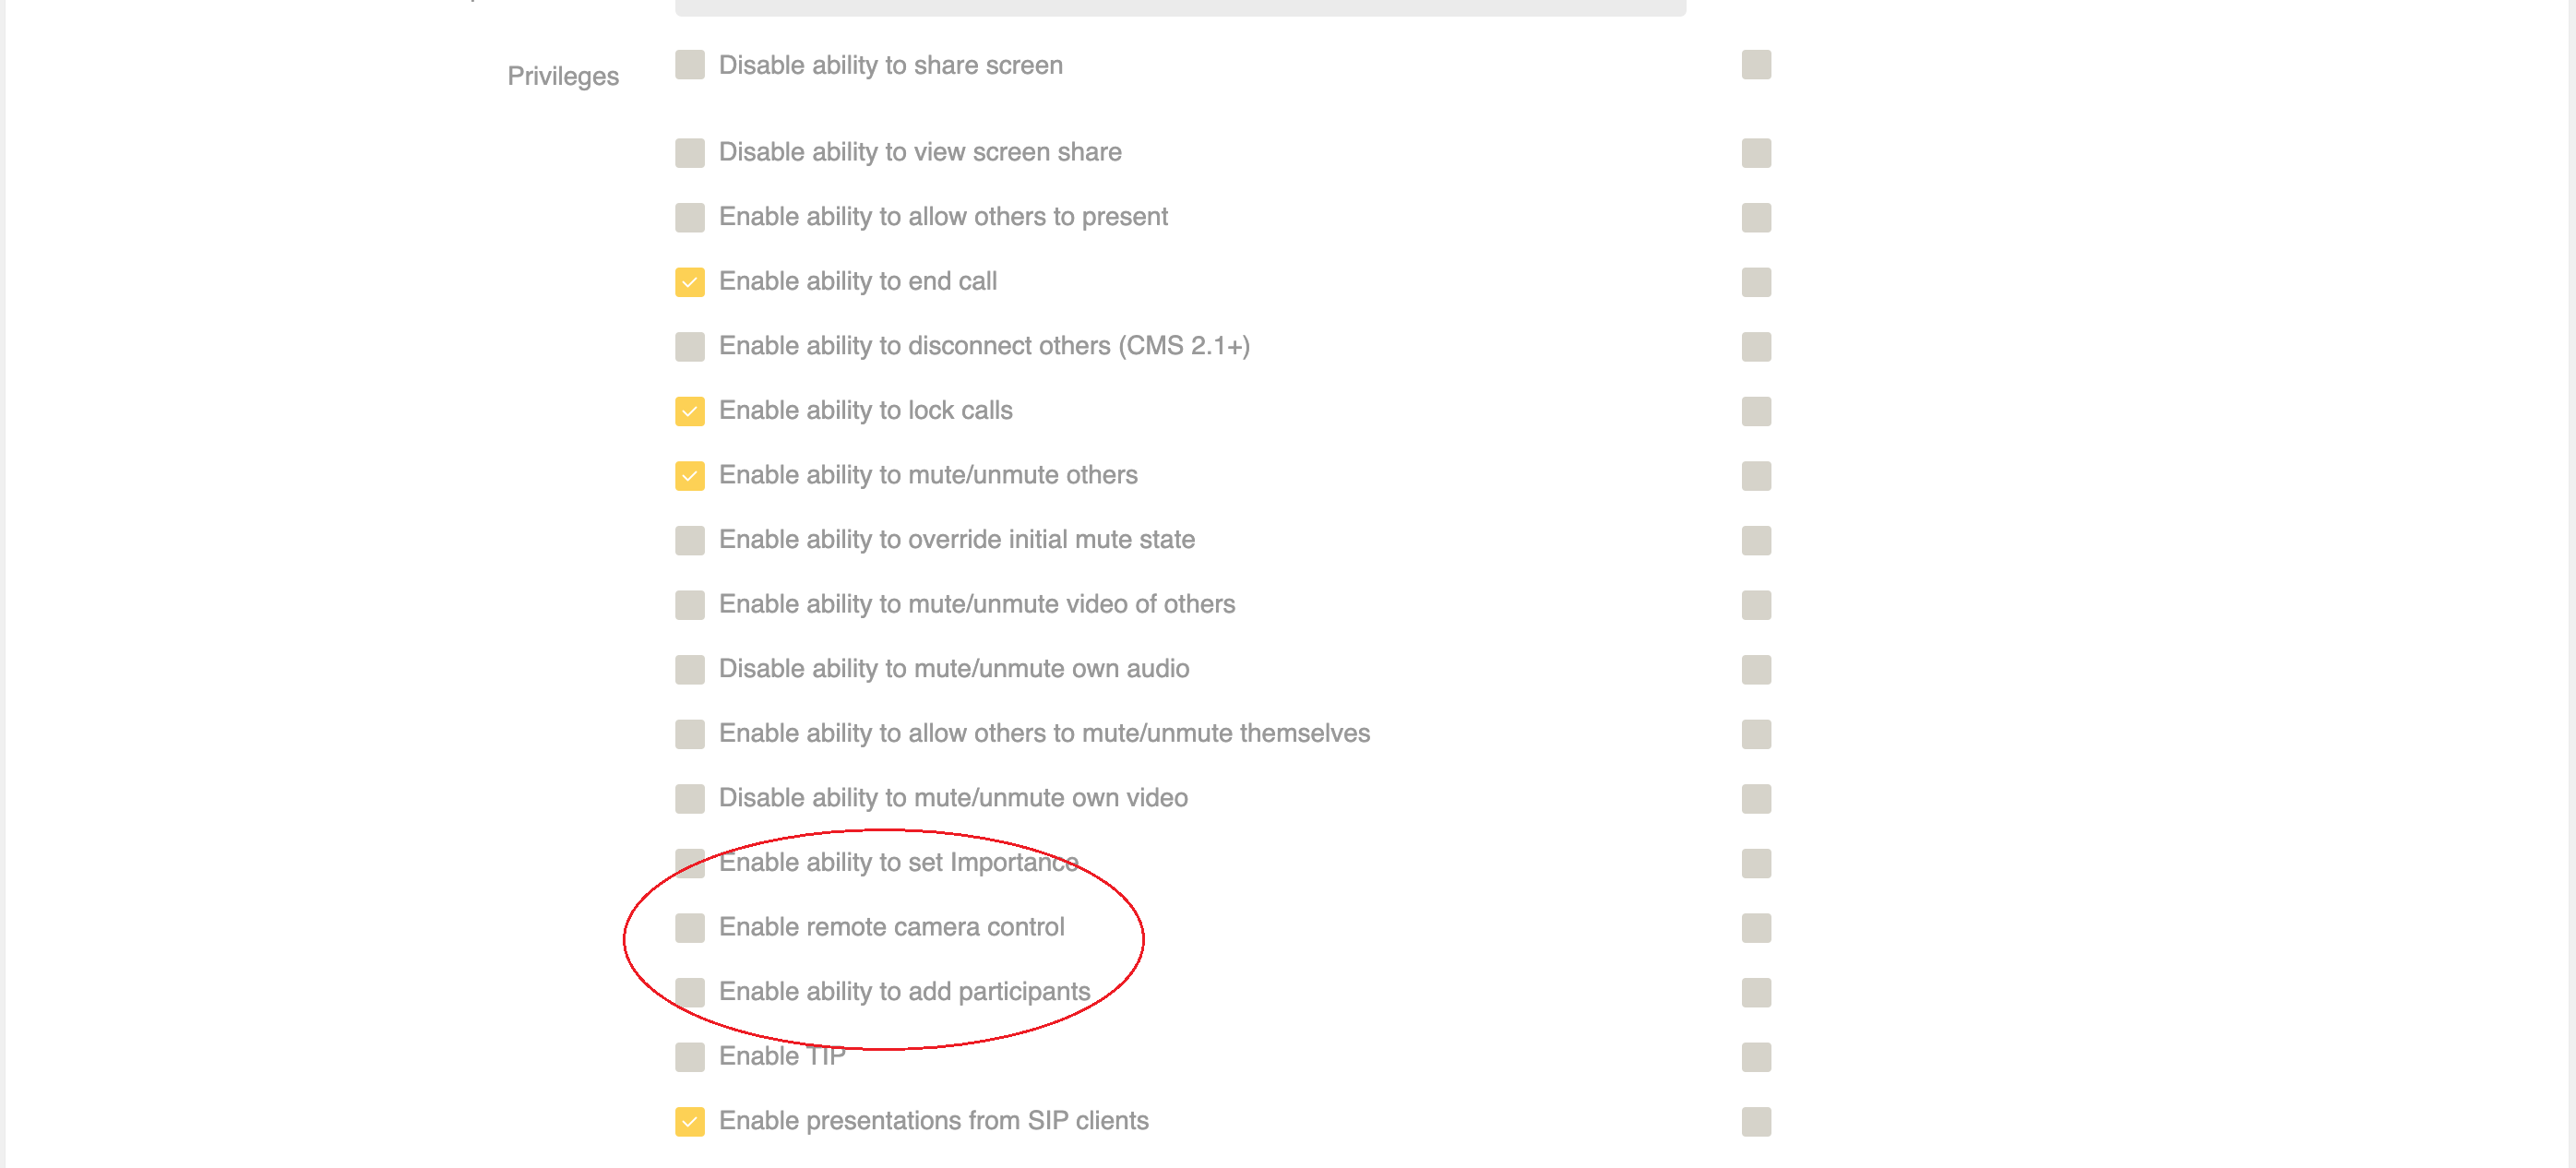
At VQ Conference Manager 3.7, we added new properties on Space Template/Roles
- Set Importance
- ControlRemoteCameraAllowed
- Auto Gain Control - this can be set or unset for each participant in a role. (At VQCM 3.8 AGC will be setable at the participant level from the Activity page.)
- Add Participant Allowed
NOTE: Enable/Disable Participant Counter was not added to the UI at 3.7; this bug will be fixed at 3.8

Activation
One of the key concepts to be familiar with is Activation.
Particpants of a role type where Activation Required is checked, will be placed in the lobby until an "Activator" joins the call; an Activator being somebody such as a Chairperson or Conference Manager. Once the Activator joins the call, the participants waiting in the lobby are automatically admitted into the call.
The Activator Role does not have the Activation Required checked.
You can control what happens to the call participants when the last activator leaves the call.
There are 3 options:
- Deactive: Non Activators stay connected but are moved back to the Lobby
- Disconnect: The non Activators are disconnected
- Remain Activated: Non Activators remain in the call when the last Activator leaves


Select the option you require from the dropdown:

The time it takes before participants are disconnected is set from Time before deactivation.
Select the time in seconds you require from the dropdown.
Quality
From CMS 2.2 there is the ability to set the maximum screen size and frame rate per second for both Main video and content for a specific Role Type.
This is set from Space Templates -> Role -> Quality.
Main Video:

The max options restrict the maximum negotiated main video call quality for this call leg based on limiting transcoding resources and are specified using a typical resolution and framerate.
NOTE: call legs may operate at lower resolutions or framerates due to endpoint limitations or overall Call Bridge load.
The options for Main video are:
- unrestricted - this is the default setting if not specified, and matches the behaviour of older Call Bridge versions, where no restrictions are placed on resolution or frame rate
- max1080p30 - restricts the Call Bridge to negotiating at most 1920x1080 screen size at 30 frames per second or equivalent transcoding resources, for example 1280x720 screen size at 60 frames per second
- max720p30 - restricts the Call Bridge to negotiating at most 1280x720 screen size at 30 frames per second or equivalent transcoding resources
- max480p30 - restricts the Call Bridge to negotiating at most 868x480 screen size at 30 frames per second or equivalent transcoding resources
Content:

The max options restrict the maximum negotiated presentation video call quality for this call leg based on limiting transcoding resources and are specified using a typical resolution and frame rate. This only affects legs which use a separate presentation stream.
The options for Content are:
- unrestricted - this is the default setting if not specified, and matches the behavior of older Call Bridge versions, where no restrictions are placed on resolution or framerate
- max1080p30 - restricts the Call Bridge to negotiating at most 1920x1080 screen size at 30 frames per second or equivalent transcoding resources
- max720p5 - restricts the Call Bridge to negotiating at most 1280x720 screen size at 5 frames per second or equivalent transcoding resources
Passcodes on Spaces
VQ Conference Manager Passcodes
When creating Spaces, VQ Conference Manager’s SpaceTemplate mechanism allows users to control the passcodes used to access the Space; the passcode allowing the Role of the Participant to be identified.
VQ Conference Manager “Secondary URI”
VQ Conference Manager allows LDAP imported users to contain a “Secondary URI” that allows customers to create an alternative URI for the Space. This will typically contain the user’s phone number which allows integration with the customer’s phone system.
When VQ Conference Manager encounters a secondary URI it extends the role information created on the CMS server by adding extra “Access Methods” for the secondary URI. The design of these access methods allow the same role pin to be used to access the system using either of the URIs, the primary or the secondary. So, if a Space is created using a template with two roles and a secondary URI the following data is added to the CMS server:
Access Method 1. SpaceUri, callId and role 1 passcode
Access Method 2. SpaceUri, callId and role 2 passcode
Access Method 3. Space Secondary Uri, callId and role 1 passcode
Access Method 4. Space Secondary Uri, callId and role 2 passcode
Thus, when a secondary URI is specified the server creates two access methods for each role, one for the primary URI and one for the secondary URI. As each access method has a unique combination of URI, callId and passcode, each one can be used to call into the Space.
Currently VQ Conference Manager only allows secondary URIs to be created when users are added to the system, using the LDAP Importer. The LDAP Configuration Settings allows the administrator to select the template to use when creating the imported user's Spaces and whether or not a secondary URI will be defined.
CMS Web UI

The CMS Web UI does not display Space Access Method details. This might be described as a feature but it can surprise the unwary. The CMS Web UI does not display URI or CallId information contained in Access Methods. Users accustomed to seeing this information for "legacy" Spaces can often be caught out by this.
Remember - once you have created a new Space Template, you need to add the Space Template to the list of templates the user can see.
Navigtion - System>UX Profiles>Select the user type e.g. Operator>Available Space Templates>Select the Space Template you required from the check box.
Applying Space Template changes to existing Spaces
A Space Template defines the properties on a Space and the different Roles that the Space supports. When a Space is created, the properties of the Space Template are used to configure it; this means new CallProfiles, CallLegProfiles and Access Methods objects are created by VQ Conference Manager and associated with the Space. Each Space, therefore, has quite a lot of associated objects linked to it on the CMS servers.
What happens if you change a SpaceTemplate after the template has used to create Spaces (for example, by the LDAP Importer)?
The existing Spaces remain as they are, unchanged; their objects (Call Profiles, Call Leg Profiles and Access Methods) remain in the same state. Nothing changes.
Any new Spaces created using the Space Template will inherit the new values.
How can you change the properties (also known as settings) on any existing Spaces?
There are two methods:
Method 1: If you have many thousand (or even just a couple of hundred), manually saving each Space is not practical. We’ve therefore produced some command line tools that allow the automated updating of Spaces. The “Space TemplateManager” tool can be used to update Spaces; it can be used in several modes and can either simply update a Space (essentially, automating the Done described above) or it can be used to switch a Space to another template.
Note: At the moment, these tools are not integrated into the main VQ Conference Manager user interface; if you need to use them, please contact support@vqcomms.com and we’ll work with you to configure and run them. Our support team can also give you access to additional documentation, designed to assist you when running the tools. The tools are not particularly user friendly (a euphemism for not at all user friendly) but they are powerful and do solve the problem of “ooops, we need to change the settings on all our 35,000 Spaces”). We expect the functionality to eventually become part of the user interface but need to make some architectural changes to allow this; rather than wait (which is not practical), we implemented the tools. TemplateManager and documentation can be downloaded from VQ Customer Portal at https://www.vqcomms.com/login/
Method 2: If you only have a couple of Spaces, the quickest solution is also the simplest.
-
Make sure you are signed into VQ Conference Manager as an Operator. To make a change to the Space Template navigate to System > Space Template and select the Space Template you wish to change
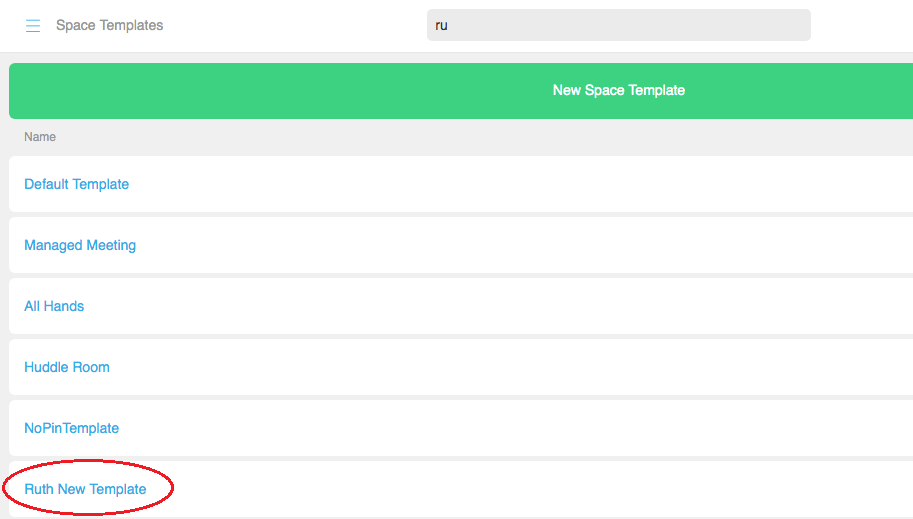
- Make the changes to the Space Template as required
-
Click Done
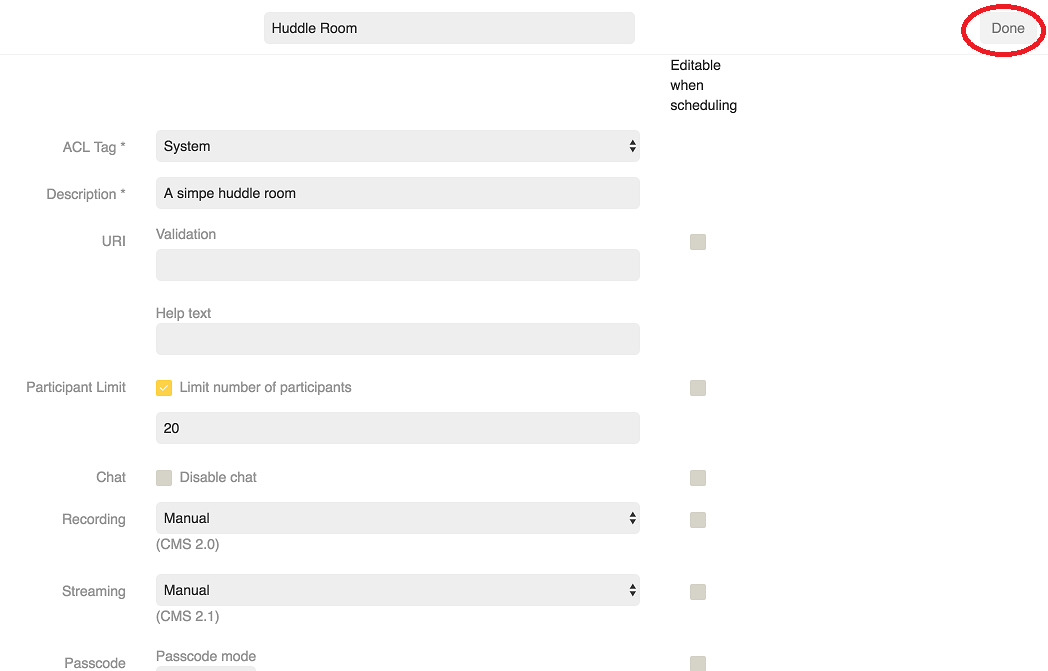
To apply to changes you have made to the Space Template to the actual Space(s) you wish to change:
Make sure you are signed into VQ Conference Manager as an Operator. Navigate to Tenants>Select the Tenant you require>Space>Settings>Click Done
NOTE: If you wish to update the Space Type, this is done from the Space Settings coApp, not the Space Template coApp.
In this case, follow steps above and then from the coSpace coApp, change the Space Type from the drop down.
Then select Done.
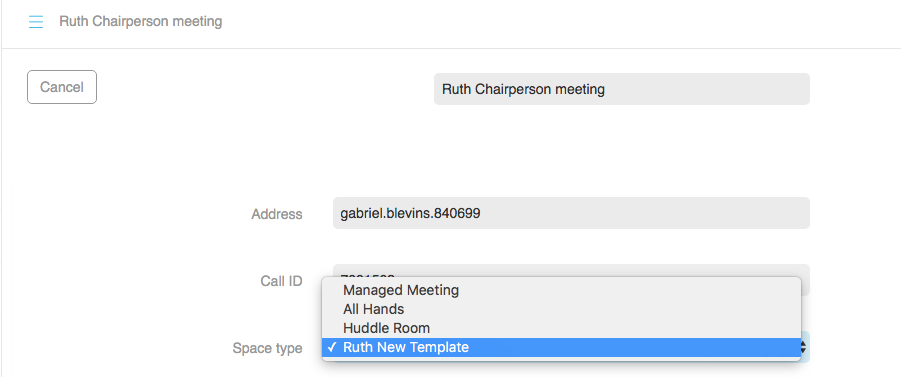
VQ Conference Manager writes the updated values to the Space and associated objects on the Call Bridge.
CAUTION: If you change the Space Type and the new type has a different number of Roles than the existing one, be aware of the following. The tool copies the Role settings over by their index (where zero is the first Role, 1 is the second Role etc). If you start off with a single Role Space Template (for example, Huddle Room) and update the Space Type to become a multi-Role type (e.g., “Managed Meeting”), the settings from your “Huddle Room” Role (PINs, Call Id and URI) will be copied to the first Role in the Managed Meeting Role (“Meeting Manager”). The second Role, in this example “Participant”, will have no values to copy from and therefore will either pick up auto-generated values (for example, PIN/passcode) or be left unassigned. To populate the unassigned values, use the LDAP Configuration page and run the importer. Multi-Role updates, as you can see, have the potential to become complicated so we recommend engaging with our support team support@vqcomms.com before proceeding with a multi-role update.
